Inventory Persistence Link to heading
Now let’s create an inventory system where the player can store and drop items. Using Spacetime DB, we’ll ensure that when you close and reopen the game, all stored inventory data is loaded again. To do this, you must have Spacetime DB installed and have created (or be ready to create) a project to use Spacetime with Rust. I highly recommend reading Spacetime Introduction (Unreal Engine) first so you understand how to create a database in Spacetime and use it with Unreal Engine.
Once you know how to create a project—or already have one set up—we’ll proceed in Rust with the Spacetime tables needed for the inventory, starting with the player table, which we’ll call “players”.
In your lib.rs file:
#[table(name = players, public)]
pub struct Player {
    #[primary_key]
    pub id: Identity,
    pub name: String,
    pub password: String,
}

#[reducer]
pub fn register_player(ctx: &ReducerContext, name: String, password: String) -> Result<(), String> {
    let player_id = ctx.sender;
    let players = ctx.db.players();

    if players.iter().any(|p| p.id == player_id) {
        return Ok(());
    }

    if players.iter().any(|p| p.name == name) {
        return Err("This name isn't available".to_string());
    }

    players.insert(Player {
        id: player_id,
        name,
        password,
    });

    Ok(())
}
In the previously written code, we have two code blocks. The first one is the Spacetime table we’re going to create, which includes an id field (for the user’s Spacetime token), name (for the player’s name), and password (for the player’s password).
The second code block contains a reducer. A reducer is a function that takes a collection of elements and combines them into a single accumulated value. This particular reducer checks whether the player’s name already exists in the database. If it does, it prevents the player from registering with that name; if it doesn’t, it allows the player to be registered.
Now, let’s create our table and reducers for the inventory.
#[table(name = inventory, public)]
pub struct Inventory {
    #[primary_key]
    pub id: u64,
    pub owner: String,
    pub item_name: String,
}

#[reducer]
pub fn send_item(ctx: &ReducerContext, player_name: String, item_text: String) -> Result<(), String> {
    let item_text = validate_message(item_text)?;

    let player = ctx
        .db
        .players()
        .iter()
        .find(|p| p.name == player_name)
        .ok_or("Invalid player")?;

    let last_id = ctx.db.inventory().iter().map(|i| i.id).max().unwrap_or(0);
    let new_id = last_id + 1;

    ctx.db.inventory().insert(Inventor {
        id: new_id,
        owner: player.name.clone(),
        item_name: item_text,
    });

    Ok(())
}

#[reducer]
pub fn delete_item_by_player_name(ctx: &ReducerContext, player_name: String, item_name: String) -> Result<(), String> {
    let players = ctx.db.players();

    if players.iter().any(|p| p.name == player_name) == false {
        return Err(format!("Player '{}' not found", player_name));
    }

    let inventory = ctx.db.inventory();

    if let Some(item) = inventory
        .iter()
        .find(|item| item.owner == player_name && item.item_name == item_name)
    {
        ctx.db.inventory().delete(item);
        Ok(())
    } else {
        Err(format!(
            "Item '{}' not found for player '{}'",
            item_name, player_name
        ))
    }
}
There are now three code blocks. The first block is the table for the inventory, which is called "inventory" and includes the fields id (a unique identifier for each entry in the table), owner (to store the name of the player who owns the item), and item_name (to store the name of the item). In other database examples, you might also find fields like "quantity", "rarity", or "type", but the fields you include in your table depend entirely on what you need for your project/Unreal Game.
Moving on to the second reducer, its purpose is to register an item in the table, first checking for the player who is attempting this action. In the second line of this reducer, you’ll see a function called validate_message, which you can use to verify elements within a text, for example. Below is that function.
fn validate_message(text: String) -> Result<String, String> {
    if text.is_empty() {
        Err("Messages must not be empty".to_string())
    } else {
        Ok(text)
    }
}
For now, this function only checks that the text is not empty. If it is, it returns an error with the message "Messages must not be empty".
In the third block, we have the reducer that allows us to remove an item from the table, filtered by the player’s name—in other words, it’s used to take an item away from any player.
Run your Rust project with spacetimedb start or spacetimedb-cli start, depending on which version of Spacetime you have installed.
Remember, when your changes on the server are ready, you can publish them using the following command:
spacetime publish --project-path server quickstart-chat
And if you already have your client created, you need to create the module bindings for your clients and add them to your main.rs file:
spacetime generate --lang rust --out-dir client/src/module_bindings --project-path server
Remember that you can read more details about these actions in Spacetime Introduction (Unreal Engine).
Unreal Inventory Setup Link to heading
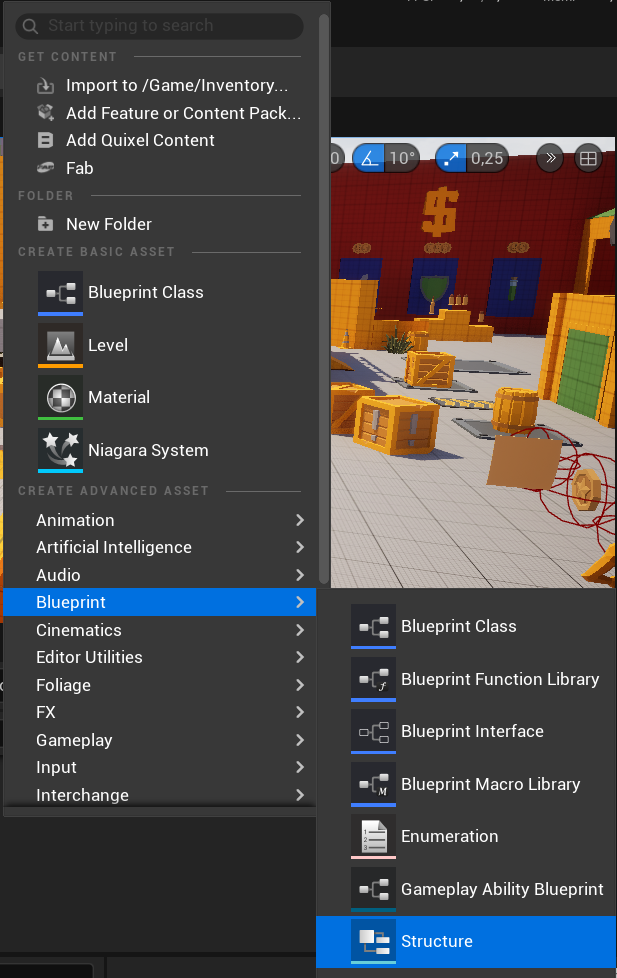
I recommend creating a new folder in your Content Browser named “Inventory.” Inside this folder, create a structure and save it with the name “S_Inventory”.
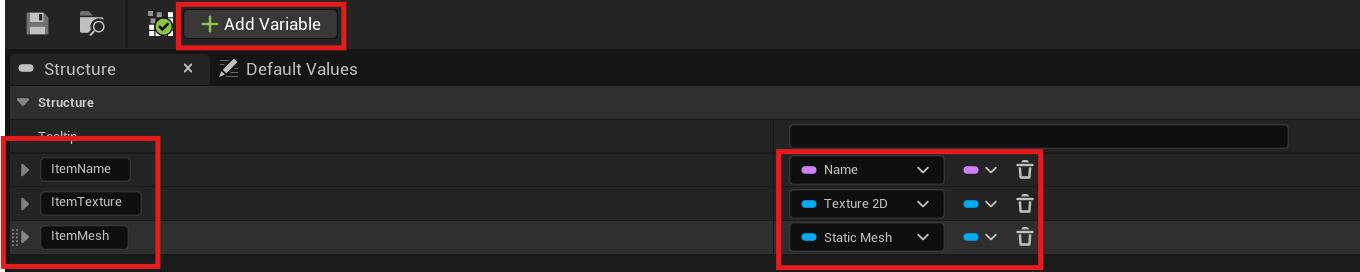
Open your structure and add three variables using the “Add variable” button. Name them “ItemName”, “ItemTexture”, and “ItemMesh”, and set their types to Name, Texture2D, and Static Mesh, respectively. You can add more variables depending on how complex you want your item to be.
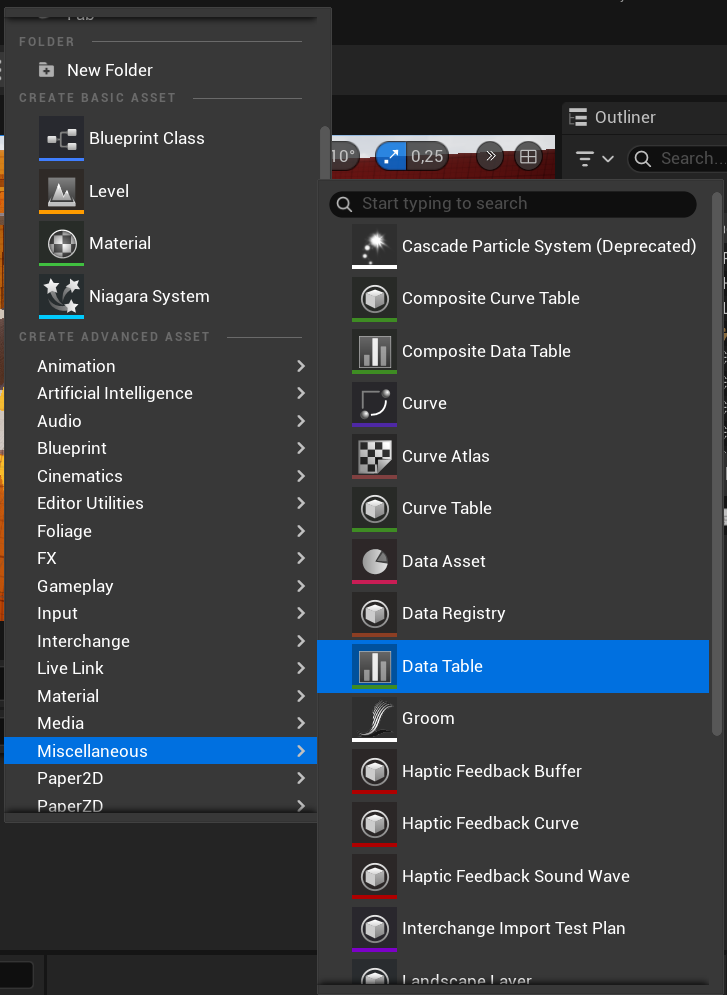
Now create a DataTable.
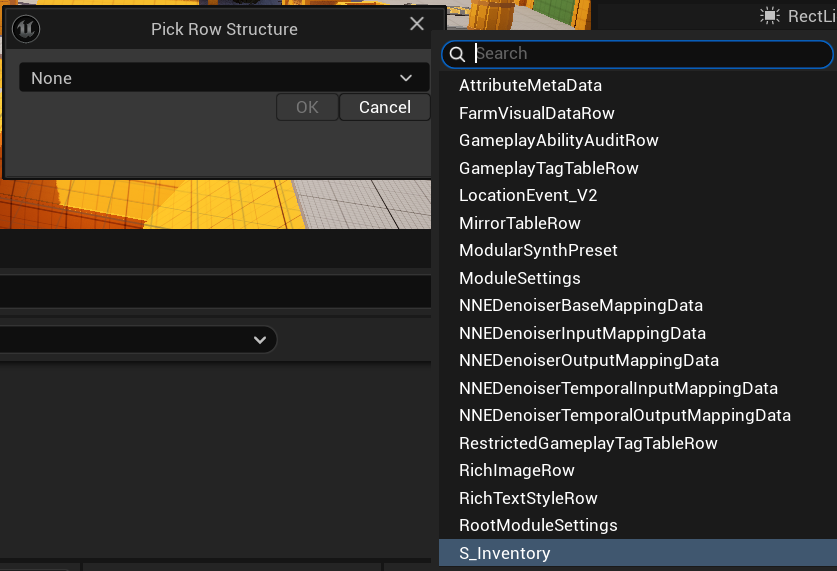
You will see this window, which will ask you to select a structure on which the DataTable will be created. Look for and select your S_Inventory struct. Name your DataTable as DT_Inventory.
Inside your DataTable, add 3 new rows and fill their fields accordingly. For this example, we will create a coin, an apple, and a grenade.
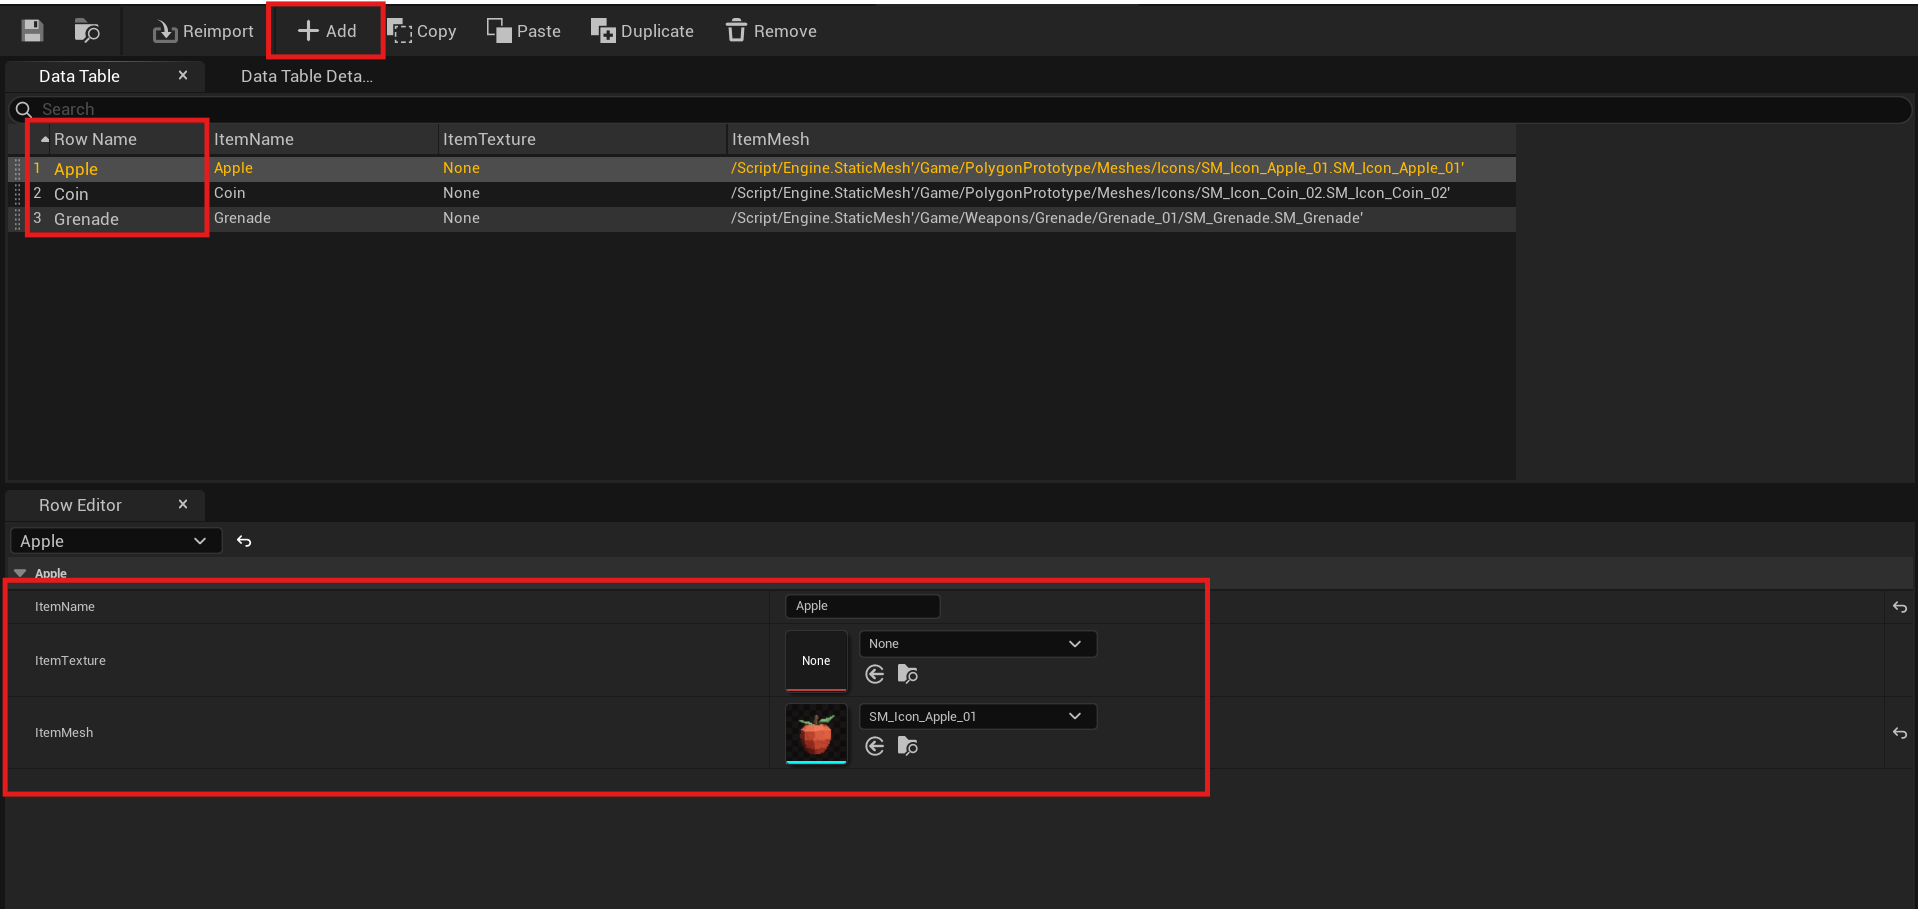
Make sure to change the name of your Row Name and verify that it matches exactly the name you assign in the ItemName field.
Now go to your C++ folders and create a new class, which can be a child class of Actor or Static Mesh Actor (for this example, the latter is used) and name it something related to Item (in this example, the class was named “MTItem”).
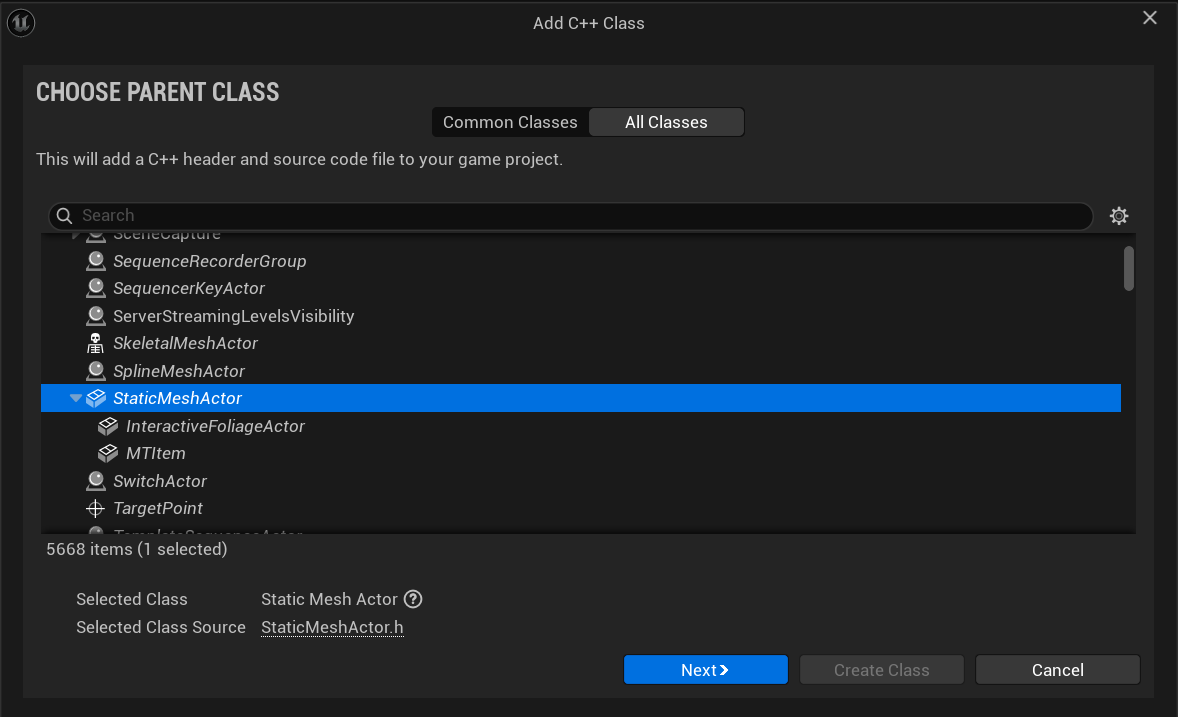
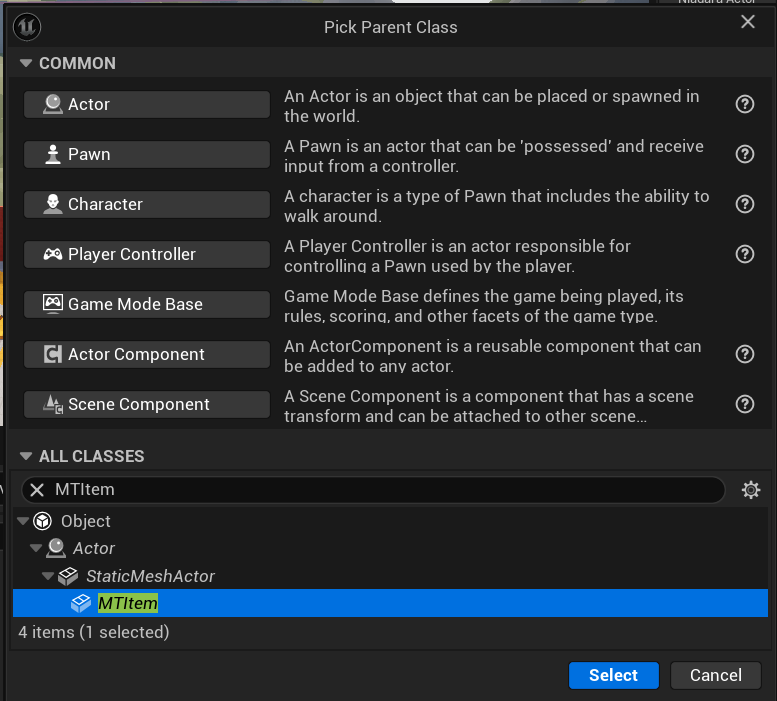
Go back to the Content/Inventory folder in your project and create a new Blueprint, making it a child of the class we just created. Name it “BP_Item.”
Now in C++, navigate to your MTItem class, and in the .h file, we will declare some variables and components for functionality, such as a sphere collision and a Mesh Component. It’s important to mention that the variables that belong directly to the item’s identity, like ItemName and ItemMesh, must be replicated.
#pragma once

#include "CoreMinimal.h"
#include "Engine/StaticMeshActor.h"
#include "MTItem.generated.h"

UCLASS()
class MT_API AMTItem : public AStaticMeshActor

{
	GENERATED_BODY()

public:
	UPROPERTY(EditAnywhere, BlueprintReadWrite, Category = "Item", meta = (ExposeOnSpawn = true), Replicated)
	FString ItemName = "";

	UPROPERTY(BlueprintReadWrite, Category = "Item", meta = (ExposeOnSpawn = true), Replicated)
	UStaticMesh* ItemMesh;

private:
	UPROPERTY(VisibleAnywhere)
	UStaticMeshComponent* MeshComponent;

	void GetLifetimeReplicatedProps(TArray<FLifetimeProperty>& OutLifetimeProps) const;
};
In the .cpp file of the same class, we will define the function GetLifetimeReplicatedProps, which is used to specify the variables we want to replicate. Don’t forget to include #include "Net/UnrealNetwork.h" in your .cpp headers.
void AMTItem::GetLifetimeReplicatedProps(TArray<FLifetimeProperty>& OutLifetimeProps) const
{
    Super::GetLifetimeReplicatedProps(OutLifetimeProps);

    DOREPLIFETIME(AMTItem, ItemName);
    DOREPLIFETIME(AMTItem, ItemMesh);
}
Save your files and compile. Go back to your BP_Item blueprint.
Call the BeginPlay event, and right there you can create the following node graph. Make sure to assign the DataTable we have been using to your Get Data Table Row node.
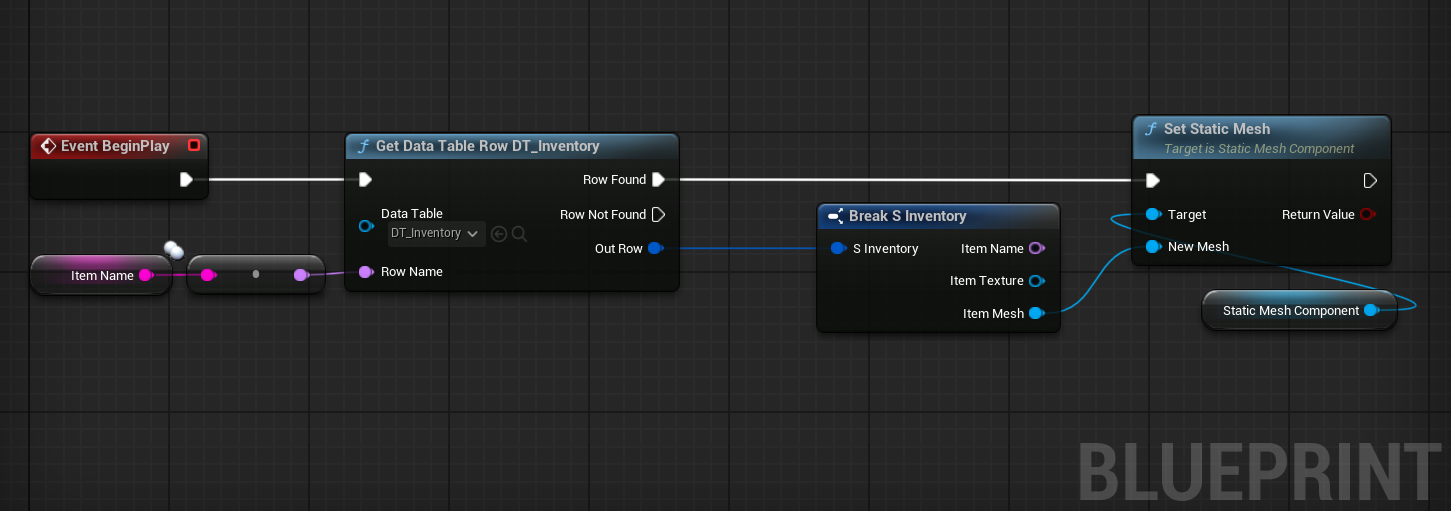
What this block of code does is use the Item’s name to search in the DataTable for the Row that matches the Item’s name. If it finds it, it will assign the corresponding Mesh for that Item to your Blueprint. It is very important that the Row Name field and the ItemNames are exactly the same.
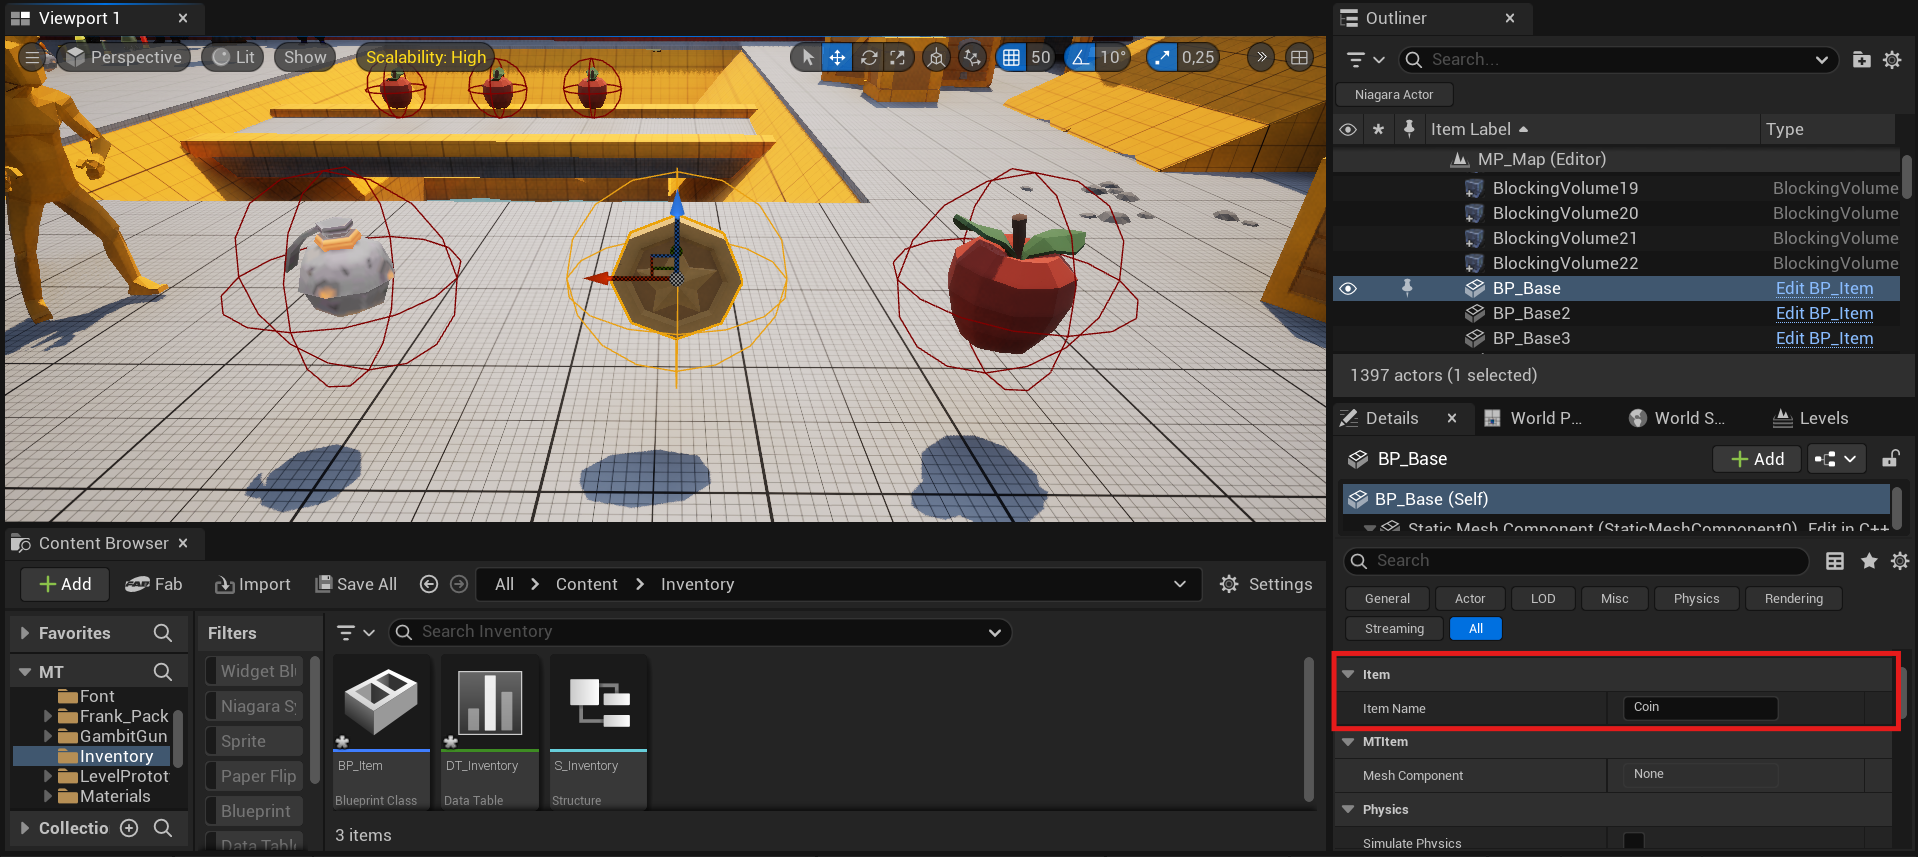
Drag your BP_Item into your viewport and, in the details panel, find the ItemName variable. Assign the names of the items you created to each instance of your blueprint.
Inventory Widget Setup Link to heading
For our inventory, we’re going to create some widgets. The first is the inventory widget itself, which will display the items stored in our inventory.
Create two new UserWidgets, naming one WBP_Inventory and the other WBP_EntryInventory. You can create a C++ class for each widget if you prefer, but in this case, it won’t be necessary.
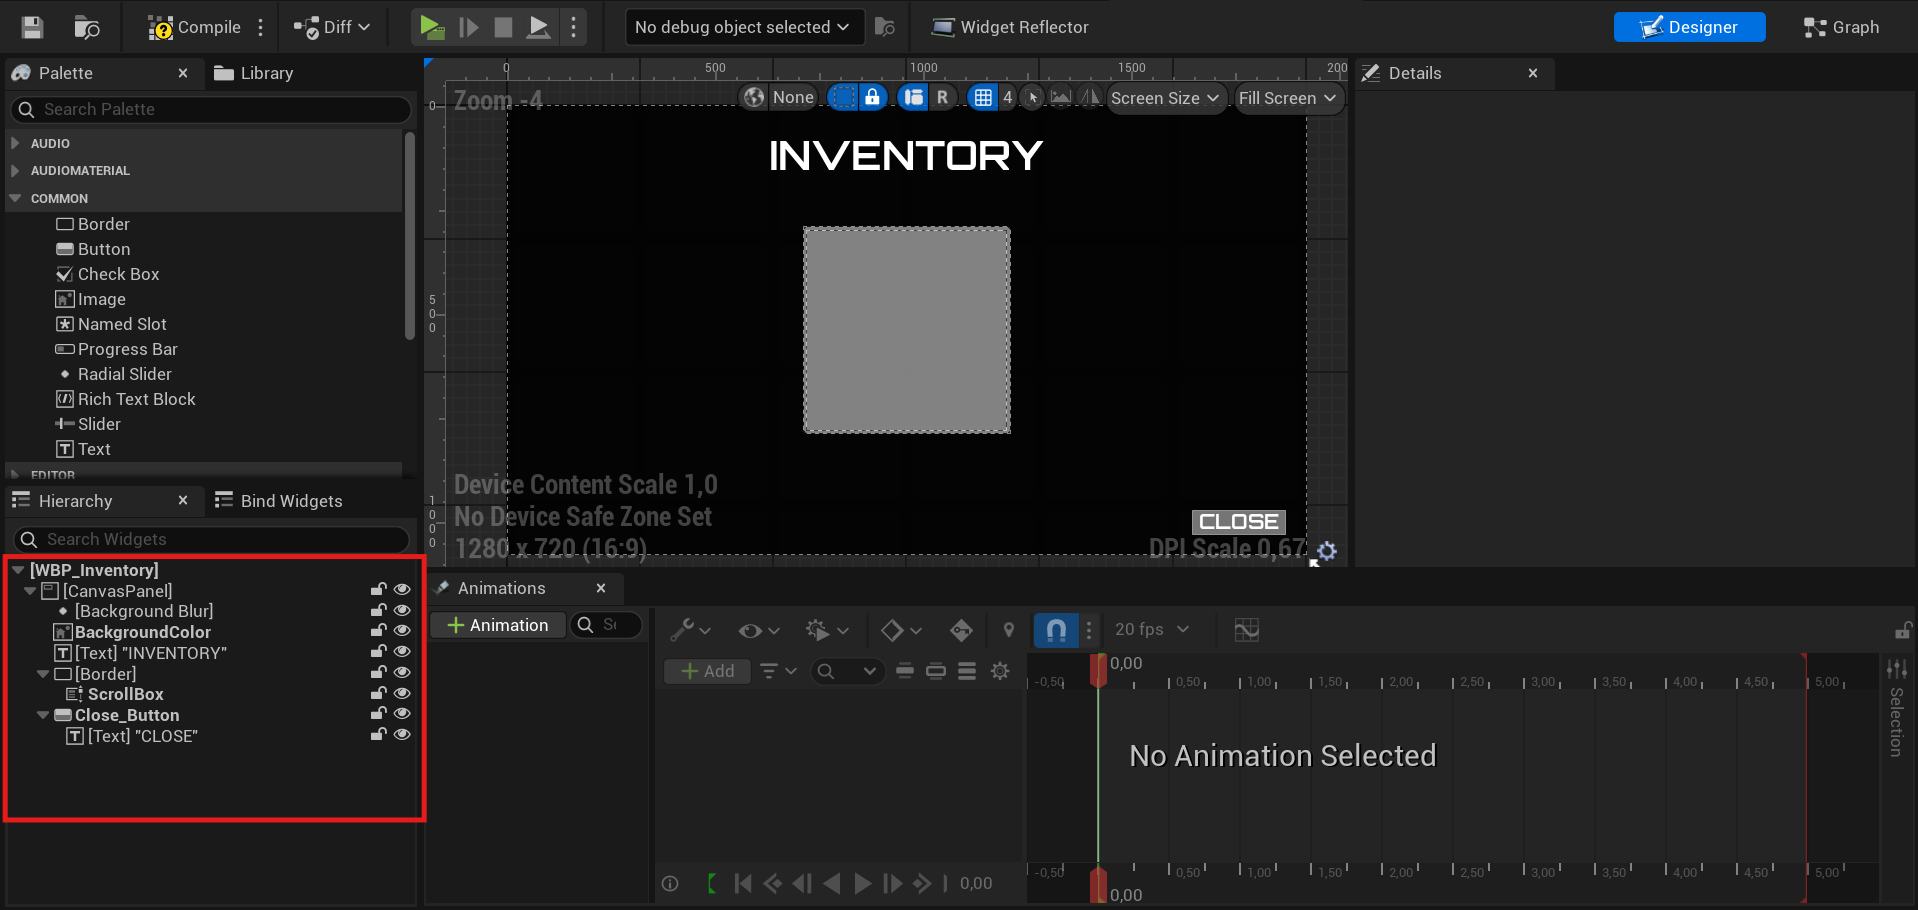
First, let’s start with WBP_Inventory. The essential elements of this widget are three: Border, ScrollBox, and CloseButton. The rest are purely visual elements. Make sure your element hierarchy matches the one shown in the following image.
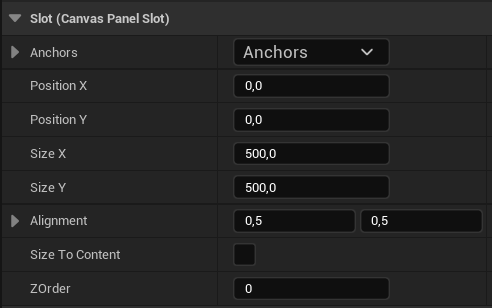
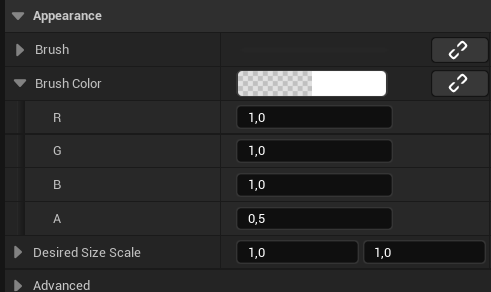
The values set for the Border can vary according to your preferences. For this case, the image below will provide you with the values used in the example for this element (the Anchors are centered).
The next element is the ScrollBox, as a child of the Border, and this element can keep its default values if you prefer.
These are the position values for the button (the Anchors are located at the bottom right corner).
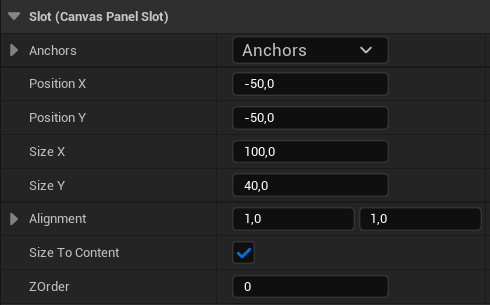
Compile and save your widget.
Now open your WBP_EntryWidget. Here are the elements that this widget should contain:
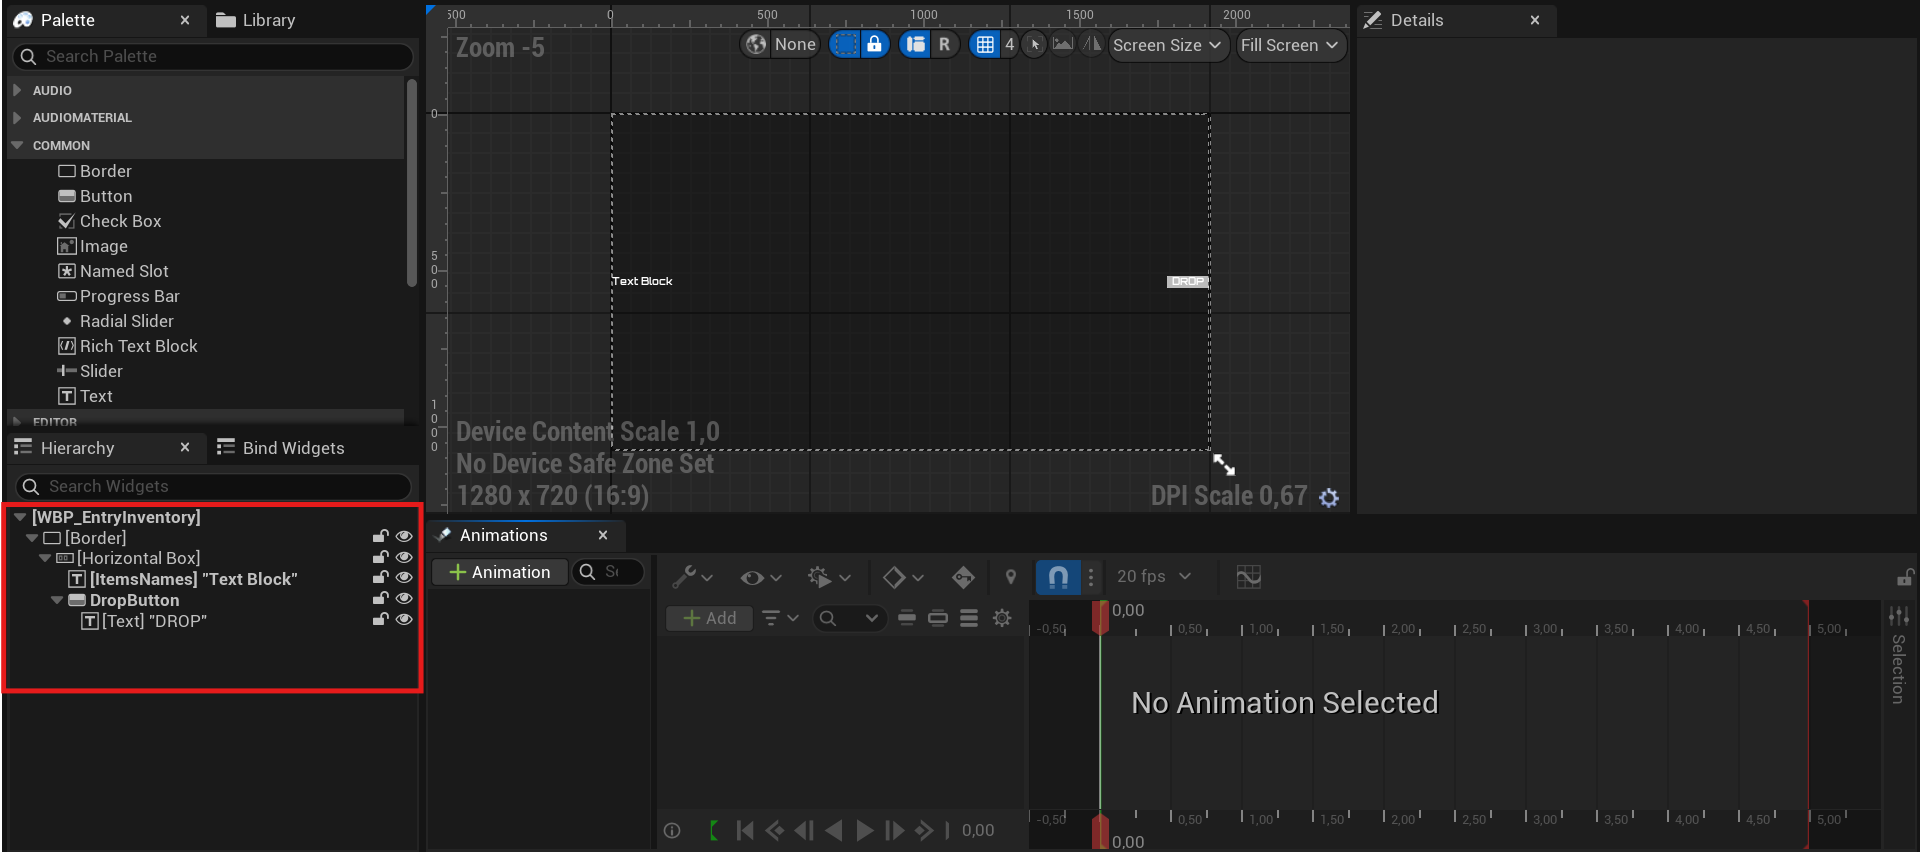
For this case, you can keep the default values for Border and Horizontal Box if you prefer. The text setup is as follows:
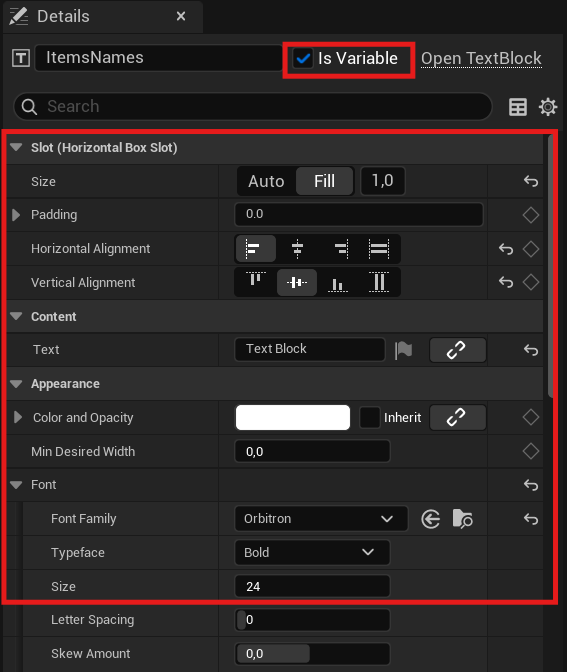
It’s important to emphasize that the text should be a variable.
And the button setup is as follows:
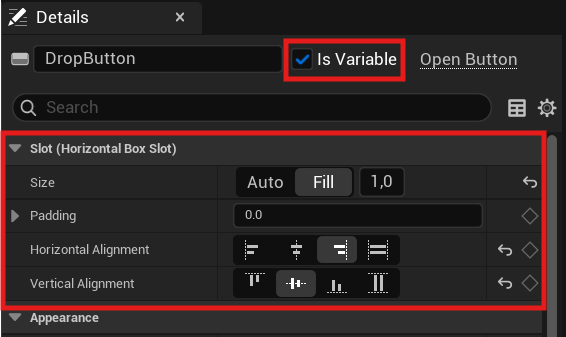
It’s important to emphasize that the button should be a variable.
Compile and save your widget.
HTTP Request in Unreal C++ Link to heading
Next, we’ll start calling our reducers and executing SQL queries via HTTP Requests. To better understand how they work, it’s highly recommended to first read HTTP Requests.
The first thing we need to do before creating functions for our reducers is to obtain the Spacetime Token.
Create a class of type PlayerController if you don’t already have one, and declare and define the following variable and functions with the code below:
In your .h file:
UPROPERTY(BlueprintReadWrite)
FString SpacetimeToken = "";

UFUNCTION()
void GetSpacetimeToken();

void SpacetimeTokenResponse(FHttpRequestPtr Request, FHttpResponsePtr Response, bool bConnectedSuccessfully);
In your .cpp file:
//Get Spacetime Token
void AMTPlayerController::GetSpacetimeToken()
{
	FString URL = "http://127.0.0.1:3000/v1/identity";
	TSharedRef<IHttpRequest, ESPMode::ThreadSafe> Request = FHttpModule::Get().CreateRequest();
	Request->SetURL(URL);
	Request->SetVerb(TEXT("POST"));
	Request->OnProcessRequestComplete().BindUObject(this, &ThisClass::SpacetimeTokenResponse);
	Request->ProcessRequest();
}

//Get Spacetime Token Response
void AMTPlayerController::SpacetimeTokenResponse(FHttpRequestPtr Request, FHttpResponsePtr Response,
	bool bConnectedSuccessfully)
{
	if (!bConnectedSuccessfully || !Response.IsValid())
	{
		GEngine->AddOnScreenDebugMessage(-1, 5.0, FColor::Red, TEXT("Failed to connect to Spacetime server."));
		return;
	}

	if (Response->GetResponseCode() == 200)
	{
		TSharedRef<TJsonReader<>> Reader = TJsonReaderFactory<>::Create(Response->GetContentAsString());
		TSharedPtr<FJsonObject> ResponseObj;
		if (FJsonSerializer::Deserialize(Reader, ResponseObj))
		{
			FString NewToken;
			if (ResponseObj->TryGetStringField(TEXT("token"), NewToken))
			{
				SpacetimeToken = NewToken;
			}
			else
			{
				GEngine->AddOnScreenDebugMessage(-1, 5.0, FColor::Red, TEXT("Token field not found in response."));
			}
		}
		else
		{
			GEngine->AddOnScreenDebugMessage(-1, 5.0, FColor::Red, TEXT("Failed to parse JSON response."));
		}
	}
	else
	{
		GEngine->AddOnScreenDebugMessage(-1, 5.0, FColor::Red, FString::Printf(TEXT("Server returned code: %d"), Response->GetResponseCode()));
	}
}
In your GetSpacetimeToken function, the first line is something like: FString URL = "http://127.0.0.1:3000/v1/identity";
Make sure that after http://127.0.0.1:3000/v1/ you write "identity", since this will allow us to obtain the Spacetime Token of the user requesting it.
Your GetSpacetimeToken function will execute SpacetimeTokenResponse which, upon successfully obtaining the requested token, will assign it to the variable SpacetimeToken that we declared earlier.
Ideally, you should call your GetSpacetimeToken function in the Event BeginPlay.
At this point, if you don’t have a PlayerState, create a new class and in the .h file declare the following function and variables:
We will temporarily assign a value to PlayerName and PlayerPassword.
public:
    UPROPERTY(Replicated, BlueprintReadWrite)
    FString PlayerName = "Player123";

    UPROPERTY(Replicated, BlueprintReadWrite)
    FString PlayerPassword = "Player123";

protected:
	virtual void GetLifetimeReplicatedProps(TArray<FLifetimeProperty>& OutLifetimeProps) const override;
And now, in the .cpp file of your PlayerState, define the following function and don’t forget to include the header: #include "Net/UnrealNetwork.h"
This is essential for enabling replication support in Unreal Engine.
void AMTPlayerState::GetLifetimeReplicatedProps(TArray<FLifetimeProperty>& OutLifetimeProps) const
{
	Super::GetLifetimeReplicatedProps(OutLifetimeProps);
	DOREPLIFETIME(AMTPlayerState, PlayerName);
	DOREPLIFETIME(AMTPlayerState, PlayerPassword);
}
Now back in your PlayerController, declare and define the following functions:
//Add a player to database if the player not exists
void AMTPlayerController::PostToPlayerSpacetime()
{
	FString URL = "http://127.0.0.1:3000/v1/database/quickstart-chat/call/register_player";
	TSharedRef<IHttpRequest, ESPMode::ThreadSafe> Request = FHttpModule::Get().CreateRequest();
	Request->SetURL(URL);
	Request->SetVerb(TEXT("POST"));
	Request->SetHeader(TEXT("Authorization"), FString::Printf(TEXT("Bearer %s"), *SpacetimeToken));
	Request->SetHeader(TEXT("Content-Type"), TEXT("application/json"));

	AMTPlayerState* MTPS = Cast<AMTPlayerState>(PlayerState);
	if (!MTPS)
	{
		GEngine->AddOnScreenDebugMessage(-1, 3.0f, FColor::Red, TEXT("Player State cast failed"));
		return;
	}

	TSharedPtr<FJsonObject> JsonObject = MakeShareable(new FJsonObject());
	JsonObject->SetStringField(TEXT("name"), MTPS->PlayerName);
	JsonObject->SetStringField(TEXT("password"), MTPS->PlayerPassword);

	FString RequestBody;
	TSharedRef<TJsonWriter<>> Writer = TJsonWriterFactory<>::Create(&RequestBody);
	if (FJsonSerializer::Serialize(JsonObject.ToSharedRef(), Writer))
		Request->SetContentAsString(RequestBody);

	Request->OnProcessRequestComplete().BindUObject(this, &ThisClass::SpacetimePlayerPostResponse);
	Request->ProcessRequest();
}

// Spacetime Player Post Response
void AMTPlayerController::SpacetimePlayerPostResponse(FHttpRequestPtr Request, FHttpResponsePtr Response, bool bConnectedSuccessfully)
{
	GEngine->AddOnScreenDebugMessage(-1, 5.f, FColor::Emerald, FString::Printf(TEXT("Post Player response %i"), Response->GetResponseCode()));
	if (Response->GetResponseCode() == 200)
	{
		GEngine->AddOnScreenDebugMessage(-1, 5.f, FColor::Green, FString::Printf(TEXT("Player added to the Database")));
		TSharedRef<TJsonReader<>> Reader = TJsonReaderFactory<>::Create(Response->GetContentAsString());
		TSharedPtr<FJsonObject> ResponseObj;
		FJsonSerializer::Deserialize(Reader, ResponseObj);
	}
	else
		if(Response->GetResponseCode() == 400)
		{
			GEngine->AddOnScreenDebugMessage(-1, 5.f, FColor::Red, FString::Printf(TEXT("Error adding player to the Database")));
		}
}
In the PostToPlayerSpacetime function, in the first line of code we have: FString URL = "http://127.0.0.1:3000/v1/database/quickstart-chat/call/register_player";
quickstart-chat is the name of the project, and register_player is the name under which, in this example, the reducer was created to register players without duplicates—so it’s essential that you verify those details are correctly set in your URL.
Right after casting to the Player State, we have these lines:
TSharedPtr<FJsonObject> JsonObject = MakeShareable(new FJsonObject());
	JsonObject->SetStringField(TEXT("name"), MTPS->PlayerName);
	JsonObject->SetStringField(TEXT("password"), MTPS->PlayerPassword);
It is very important that you include one line of JsonObject->SetStringField for each field you want to send data to when this reducer is executed. "name" and "password" are exactly the names of the fields that exist in the players table. Make sure they are written exactly the same way as the field names in your table.
When you execute PostToPlayerSpacetime and the request completes, SpacetimePlayerPostResponse will be triggered and emit a response.
Call your PostToPlayerSpacetime function using a debug input or shortly after obtaining your SpacetimeToken (one or two seconds later), and verify that your players table contains a player with the name and password you assigned as values in the variables declared in your Player State. You can run an SQL query in the Visual Studio Code terminal to check.
Querys:
- spacetimedb sql quickstart-chat “SELECT * FROM players”
- spacetimedb-cli sql quickstart-chat “SELECT * FROM players”
Now let’s create a function that allows us to send items to the database as soon as we pick them up. In your PlayerController, declare and define the following function:
//Post to Inventory Spacetime (Send an item to the database)
void AMTPlayerController::PostToInventorySpacetime()
{
	FString URL = "http://127.0.0.1:3000/v1/database/quickstart-chat/call/send_item";
	TSharedRef<IHttpRequest, ESPMode::ThreadSafe> Request = FHttpModule::Get().CreateRequest();
	Request->SetURL(URL);
	Request->SetVerb(TEXT("POST"));
	Request->SetHeader(TEXT("Authorization"), FString::Printf(TEXT("Bearer %s"), *SpacetimeToken));
	Request->SetHeader(TEXT("Content-Type"), TEXT("application/json"));

	TSharedPtr<FJsonObject> JsonObject = MakeShareable(new FJsonObject());
	FString PlayerName;
	AMTPlayerState* MTPS = Cast<AMTPlayerState>(PlayerState);
	if (MTPS)
	{
		PlayerName = MTPS->PlayerName;
	}
	JsonObject->SetStringField(TEXT("player_name"), PlayerName);
	JsonObject->SetStringField(TEXT("item_text"), Item);

	FString RequestBody;
	TSharedRef<TJsonWriter<>> Writer = TJsonWriterFactory<>::Create(&RequestBody);
	if (FJsonSerializer::Serialize(JsonObject.ToSharedRef(), Writer))
	{
		Request->SetContentAsString(RequestBody);
	}

	Request->OnProcessRequestComplete().BindUObject(this, &ThisClass::SpacetimeInventoryPostResponse);
	Request->ProcessRequest();

	GEngine->AddOnScreenDebugMessage(-1, 3.0f, FColor::Green, TEXT("Item Added to Database"));
}
In the first line of your function FString URL = "http://127.0.0.1:3000/v1/database/quickstart-chat/call/send_item";, remember that after the last /, you must write the exact name of your Rust reducer as it’s declared.
And just below the cast to PlayerState, you have these two lines:
JsonObject->SetStringField(TEXT("player_name"), PlayerName);JsonObject->SetStringField(TEXT("item_text"), Item);
Inside TEXT(""), you must write exactly the name of the field you want to send data to, and then pass the parameter that contains that data, just as shown in the code lines.
Once you have successfully created the previous function, declare and define the following function in your PlayerController:
In your .h file:
UFUNCTION(Client, Reliable, BlueprintCallable)
void Client_ObjectInteraction(const FString& ItemName);

UPROPERTY(BlueprintReadWrite)
FString Item = "";
in your .cpp file:
void AMTPlayerController::Client_ObjectInteraction_Implementation(const FString& ItemName)
{
	Item = ItemName;
	PostToInventorySpacetime();
}
This function will allow us to set the value stored in the ItemName variable from our BP_Item class to the variable named Item in our PlayerController. Now lets go back to the BP_Item blueprint.
Add a Sphere Collision component to the blueprint.
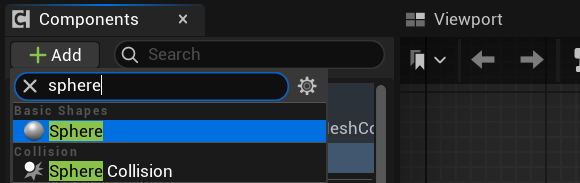
Then click on the component and select the “Begin Overlap” event, and create the following code using nodes.
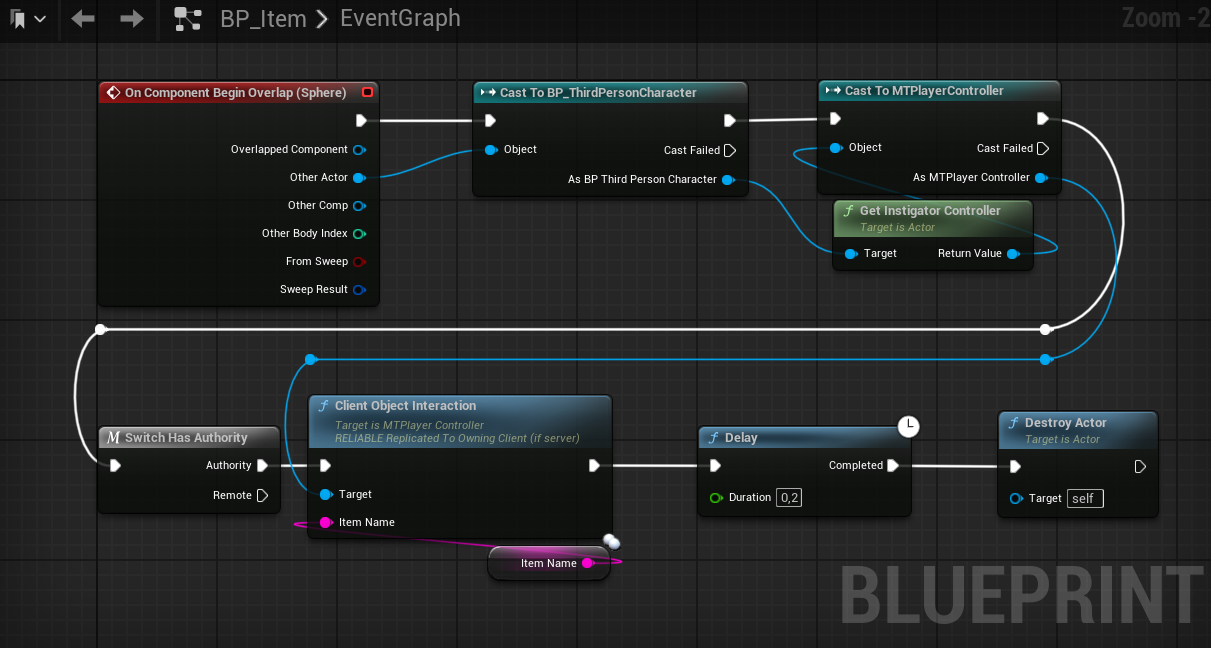
In the code, we first cast to our character class. From the character, we use Get Instigator Controller, which allows us to cast to our custom C++ PlayerController class—specifically, the controller of the player overlapping the item.
After casting to the PlayerController, we check if the player has authority (i.e., if the code is running on the server). If so, we use the PlayerController reference to call the ClientObjectInteraction function, which is replicated to clients. Finally, we add a Delay of 0.2 seconds and destroy the item actor.
The next step is to check the items stored in our inventory. To do this, we will implement an SQL query to retrieve the items owned by the player who is requesting them. If the player has items, these will then be displayed in their inventory. Declare and define the following function and variable in your PlayerController:
In your .h file:
public:
	UPROPERTY(BlueprintReadWrite)
	TArray<FString> ItemNames;

	UFUNCTION(BlueprintCallable)
	void InventorySQLConsult();
void AMTPlayerController::InventorySQLConsult()
{
	FString URL = "http://127.0.0.1:3000/v1/database/quickstart-chat/sql";

	TSharedRef<IHttpRequest, ESPMode::ThreadSafe> Request = FHttpModule::Get().CreateRequest();
	Request->SetURL(URL);
	Request->SetVerb(TEXT("POST"));
	Request->SetHeader(TEXT("Authorization"), FString::Printf(TEXT("Bearer %s"), *SpacetimeToken));
	Request->SetHeader(TEXT("Content-Type"), TEXT("text/plain"));

	AMTPlayerState* MTPS = Cast<AMTPlayerState>(PlayerState);
	if (MTPS)
	{
		FString PlayerName = MTPS->PlayerName;
		FString SQLQuery = FString::Printf(TEXT("SELECT item_name FROM inventory WHERE owner = '%s'"), *PlayerName);
		GEngine->AddOnScreenDebugMessage(-1, 5.0, FColor::Yellow, FString::Printf(TEXT("SELECT item_name FROM inventory WHERE owner = '%s'"), *PlayerName));
		Request->SetContentAsString(SQLQuery);
	}
	else
	{
		GEngine->AddOnScreenDebugMessage(-1, 5.0, FColor::Red, FString::Printf(TEXT("Cast to Player State failed")));
	}

	Request->OnProcessRequestComplete().BindLambda([this](FHttpRequestPtr Request, FHttpResponsePtr Response, bool bWasSuccessful)
		{
			if (bWasSuccessful && Response.IsValid())
			{
				FString ResponseString = Response->GetContentAsString();
				UE_LOG(LogTemp, Log, TEXT("SQL Query Response: %s"), *ResponseString);

				TSharedPtr<FJsonValue> JsonValue;
				TSharedRef<TJsonReader<>> Reader = TJsonReaderFactory<>::Create(ResponseString);
				if (FJsonSerializer::Deserialize(Reader, JsonValue) && JsonValue.IsValid())
				{
					TArray<TSharedPtr<FJsonValue>> StatementResults = JsonValue->AsArray();

					for (TSharedPtr<FJsonValue>& StatementResultVal : StatementResults)
					{
						GEngine->AddOnScreenDebugMessage(-1, 5.0, FColor::Orange, FString::Printf(TEXT("Statement result value")));
						TSharedPtr<FJsonObject> StatementResultObject = StatementResultVal->AsObject();
						if (!StatementResultObject.IsValid())
							continue;

						const TArray<TSharedPtr<FJsonValue>>* Rows;
						if (StatementResultObject->TryGetArrayField("rows", Rows))
						{
							for (const TSharedPtr<FJsonValue>& RowVal : *Rows)
							{
								if (RowVal->Type == EJson::Array)
								{
									const TArray<TSharedPtr<FJsonValue>>* RowArray = nullptr;
									if (RowVal->TryGetArray(RowArray))
									{
										for (const TSharedPtr<FJsonValue>& Element : *RowArray)
										{
											if (Element->Type == EJson::String)
											{
												FString ElementValue = Element->AsString();
												ItemNames.Add(ElementValue);
											}
										}
									}
								}
							}
						}
					}
				}
				else
				{
					UE_LOG(LogTemp, Error, TEXT("Failed to deserialize JSON response"));
				}
			}
			else
			{
				UE_LOG(LogTemp, Error, TEXT("SQL query request was not successful"));
			}
		});
	Request->ProcessRequest();
}
It’s important that in this line of code: FString URL = "http://127.0.0.1:3000/v1/database/quickstart-chat/sql";
You include “sql” at the end to indicate that the request is an SQL query. Just before /sql, you should specify the name of your project.
Our SQL query looks like this: FString SQLQuery = FString::Printf(TEXT("SELECT item_name FROM inventory WHERE owner = '%s'"), *PlayerName);
Specifically, what’s inside the double quotes is the actual SQL query, but to include a local variable (PlayerName) within the string, we use TEXT() as shown.
Breaking down the query:
SELECT item_name: This tells the database to return theitem_namefield.FROM inventory: This specifies the table where the search will take place.WHERE owner = '%s': This filters the results to only return rows where theownerfield matches the given value (e.g.,WHERE owner = 'Player_01').
Let’s analyze the following lines of the function we just wrote:
const TArray<TSharedPtr<FJsonValue>>* Rows;
						if (StatementResultObject->TryGetArrayField("rows", Rows))
						{
							for (const TSharedPtr<FJsonValue>& RowVal : *Rows)
							{
								if (RowVal->Type == EJson::Array)
								{
									const TArray<TSharedPtr<FJsonValue>>* RowArray = nullptr;
									if (RowVal->TryGetArray(RowArray))
									{
										for (const TSharedPtr<FJsonValue>& Element : *RowArray)
										{
											if (Element->Type == EJson::String)
											{
												FString ElementValue = Element->AsString();
												ItemNames.Add(ElementValue);
											}
										}
									}
								}
							}
						}
These lines parse a JSON response by first attempting to retrieve the array field named “rows” from the JSON object. If successful, they iterate through each element in this “rows” array, where each element represents a row. For each row, the code checks if it is itself an array, and if so, it extracts this nested array. Then, it goes through each element inside this nested array, and if an element is a string, it converts it to a FString and adds it to the ItemNames list. Essentially, this code navigates a nested JSON array structure to collect all the string values into the ItemNames array.
Let’s go back to our WBP_Inventory to assign the logic for retrieving the information when opening the widget.
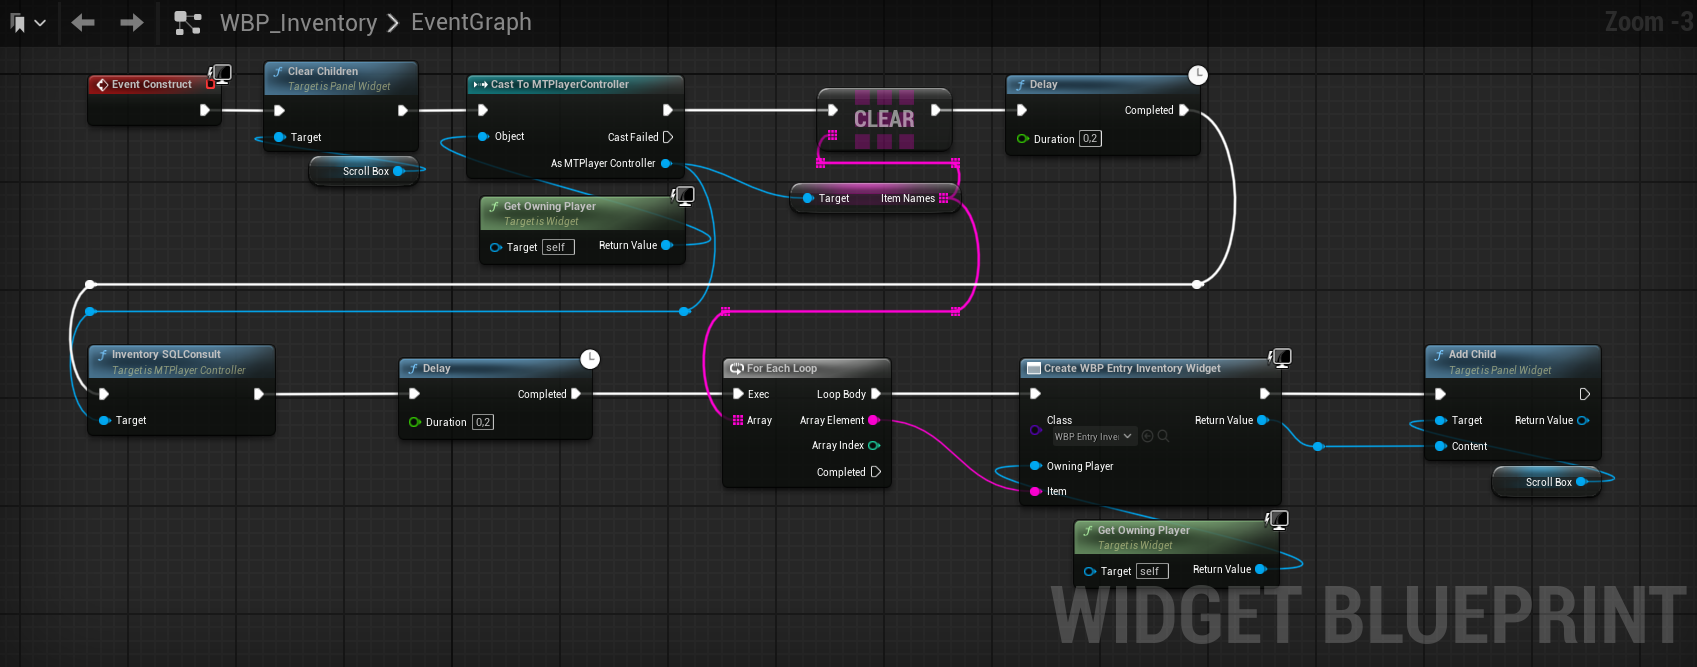
Now let’s break down the previous code. We use the EventConstruct, which means that every time this widget is created, the event and everything inside it will be executed. The first thing we do is clear the ScrollBox to prevent it from being filled with duplicate items. Then, we cast to the PlayerController using the “Get Owning Player” node as the object. With the cast, we access the array of strings from the PlayerController and clear it as well. Next, we add a 0.2-second delay and call the InventorySQLConsult function from our PlayerController. We add another 0.2-second delay to give time for InventorySQLConsult to retrieve the results and store them in our ItemNames array.
We then loop through the array with a ForEachLoop, and for each value obtained, we create a WBP_EntryWidget which has the Item variable exposed on spawn. We also pass the “Get Owning Player” to the CreateWidget node. Finally, each widget created is added as a child to the ScrollBox.
Now go to your WBP_EntryInventory and place nodes in the following way.
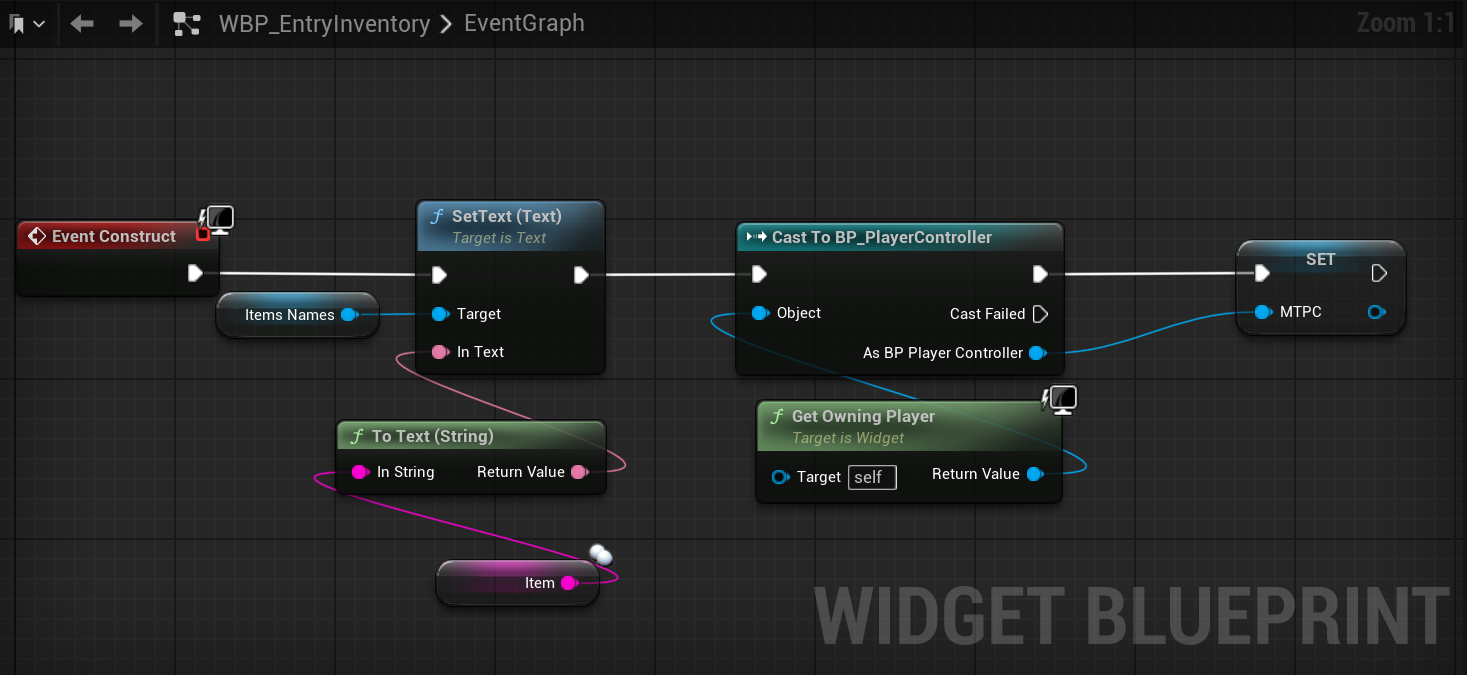
So, each time a WBP_EntryInventory is created, we will set the necessary information to display the item’s data. Additionally, we perform a cast to the PlayerController and create a variable of the same type to pass this class’s information and use it later.
Now run your project and pick up an item and when you open your inventory, all this will be executed, and we’ll see a list with all the items we’ve collected—provided that the game has retrieved the Spacetime Token and the player has been registered in the database. If you close your game and reopen it, as long as you successfully obtain your Spacetime Token, you’ll see that opening the inventory will display the items that belong to you. At this point, you have a functional inventory, and only a few details remain, which we will break down next.
Let’s go back to the PlayerController. Declare and define the following function:
//Post delete to Inventory Spacetime (Calls 'delete_item' reducer)
void AMTPlayerController::PostDeleteToInventorySpacetime()
{
	FString URL = "http://127.0.0.1:3000/v1/database/quickstart-chat/call/delete_item_by_player_name";
	TSharedRef<IHttpRequest, ESPMode::ThreadSafe> Request = FHttpModule::Get().CreateRequest();
	Request->SetURL(URL);
	Request->SetVerb(TEXT("POST"));
	Request->SetHeader(TEXT("Authorization"), FString::Printf(TEXT("Bearer %s"), *SpacetimeToken));
	Request->SetHeader(TEXT("Content-Type"), TEXT("application/json"));

	TSharedPtr<FJsonObject> JsonObject = MakeShareable(new FJsonObject);

	FString PlayerName;
	AMTPlayerState* MTPS = Cast<AMTPlayerState>(PlayerState);
	if (MTPS)
	{
		PlayerName = MTPS->PlayerName;
	}
	JsonObject->SetStringField(TEXT("player_name"), PlayerName);
	JsonObject->SetStringField(TEXT("item_name"), Item);

	FString RequestBody;
	TSharedRef<TJsonWriter<>> Writer = TJsonWriterFactory<>::Create(&RequestBody);
	if (FJsonSerializer::Serialize(JsonObject.ToSharedRef(), Writer))
	{
		Request->SetContentAsString(RequestBody);
	}

	Request->OnProcessRequestComplete().BindUObject(this, &ThisClass::SpacetimeInventoryPostResponse);
	Request->ProcessRequest();

	GEngine->AddOnScreenDebugMessage(-1, 3.0f, FColor::Green, TEXT("Item Removed from Database"));
}
With this function, we will call the reducer delete_item_by_player_name, which will delete the items that belong to the player name that accessed this function.
JsonObject->SetStringField(TEXT("player_name"), PlayerName);
JsonObject->SetStringField(TEXT("item_name"), Item);
And in the previous pair of lines, we pass the fields we want to work with in order to perform this action. We use player_name so it can filter the object by the player’s name, and item_name so it knows which item needs to be deleted.
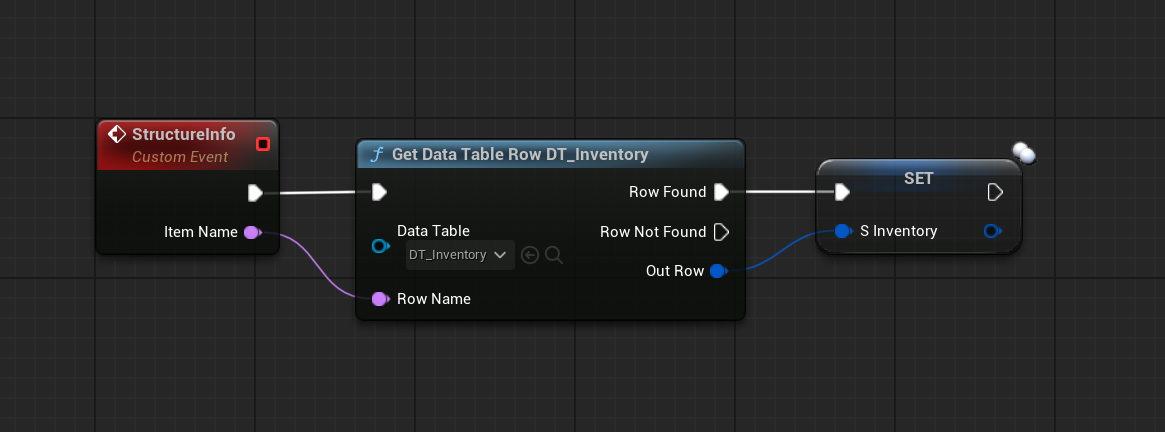
In your PlayerController blueprint, create a Custom Event named StructureInfo and give it a parameter called ItemName of type Name. Use the node Get Data Table Row, and select the inventory DataTable we created earlier. Connect the ItemName pin from the event to the Row Name input of the Get Data Table Row node. Then, create a variable from the Out Row pin to store the retrieved data.
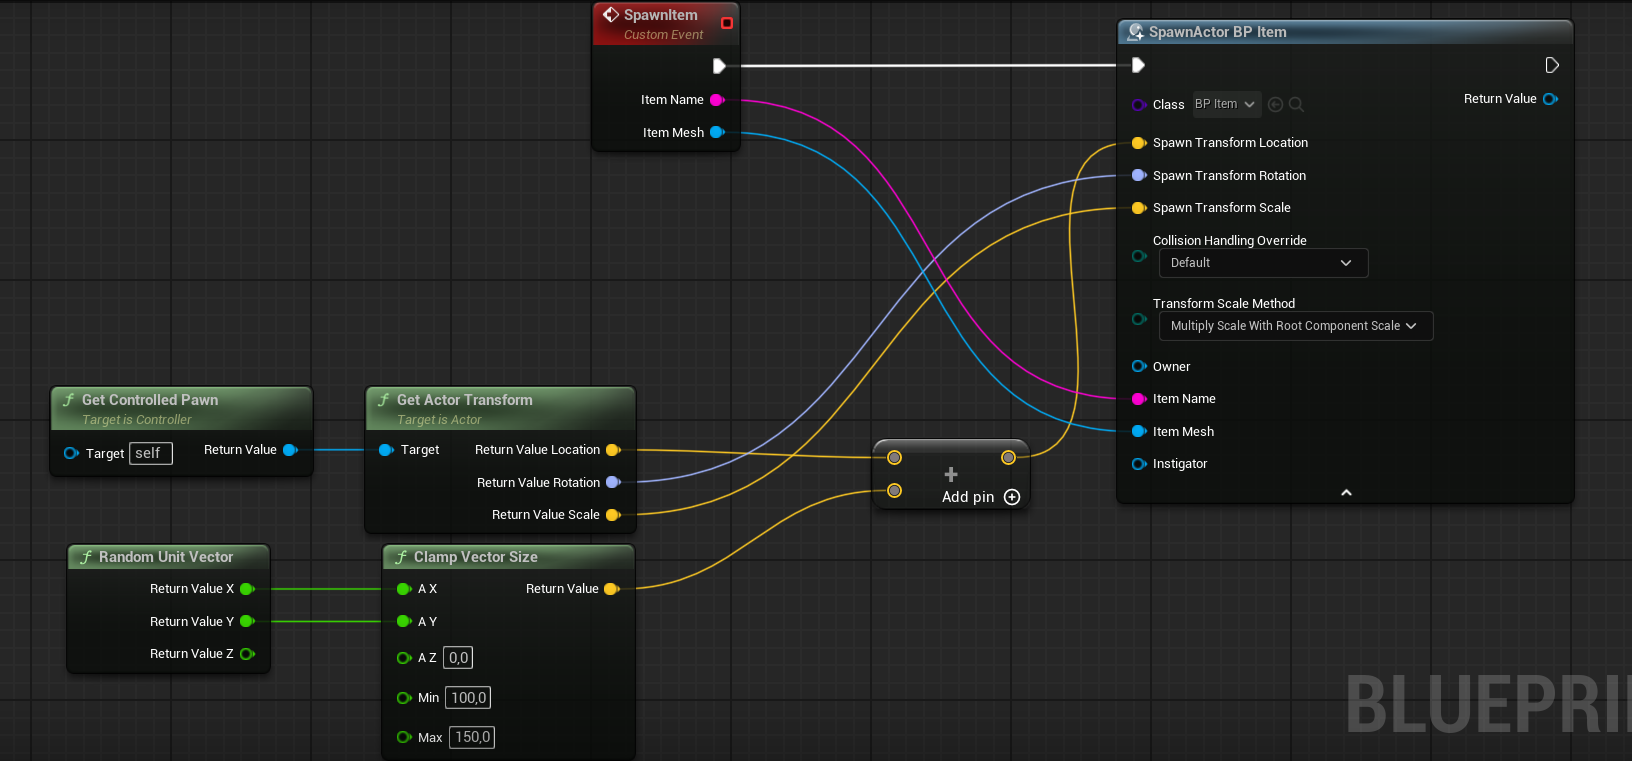
Now create a Custom Event called SpawnItem. This event will handle spawning the dropped item so that it appears next to or near the player who dropped it.
Immediately after the event node, add a SpawnActor node and set the class to spawn as BP_Item. This blueprint must have two exposed variables: ItemName and ItemMesh. You’ll need to connect both as inputs to the event so they can be passed when the item is spawned.
Next, calculate the spawn location. Use Get Controller → Get Pawn → Get Actor Transform to retrieve the player’s position, rotation, and scale. You can pass the Rotation and Scale directly into the Spawn Transform, but for the Location, add a random float (e.g., using Random Float in Range) clamped between 100 and 150 units, then add it to one of the position axes (usually X or Y) to offset it from the player.
Finally, plug this modified transform into the Spawn Transform Location of the SpawnActor node, so the item appears nearby but not exactly at the player’s feet.
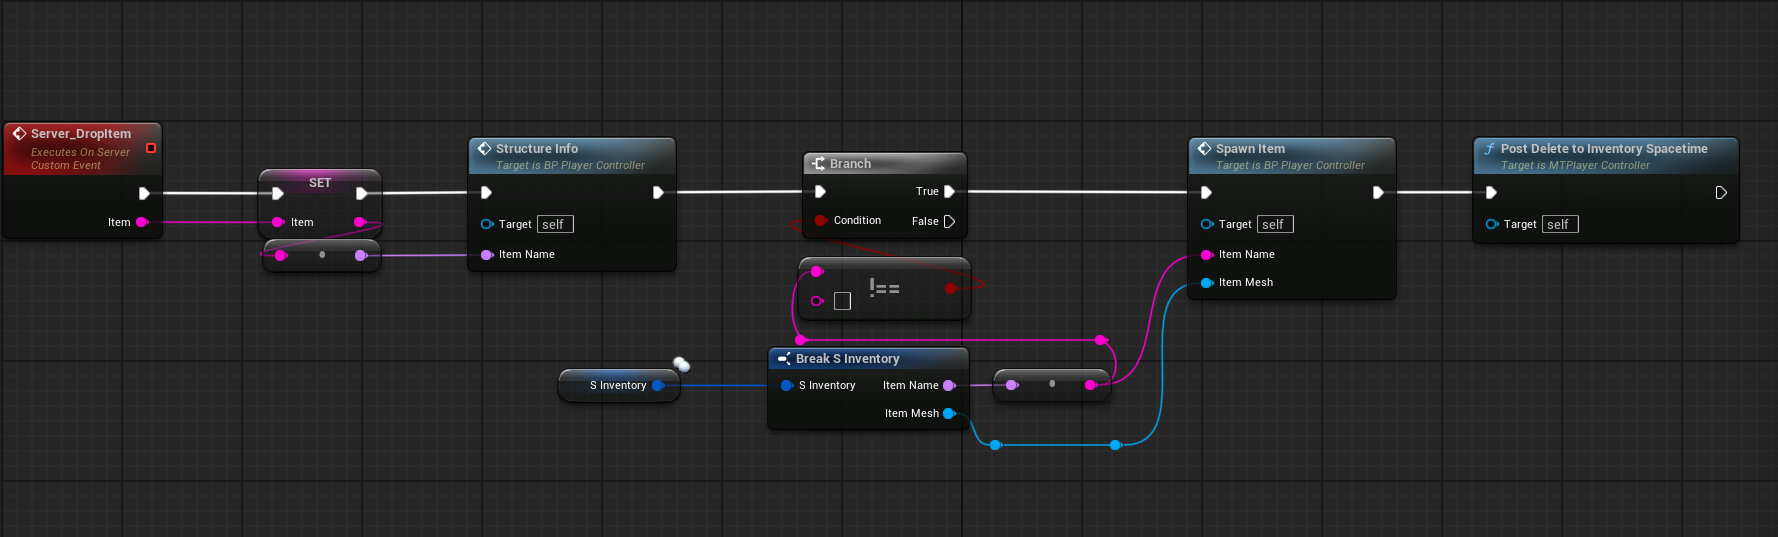
Let’s create one more Custom Event, which we’ll set to Run on Server to ensure it executes with authority.
First, inside this event, use Set ItemName, which takes a parameter from the event node — so you can connect it directly. Then, call your previously created StructureInfo event and pass the ItemName as its parameter.
Afterward, use Get SInventory — this is your structure containing the item’s data. Add a Break Struct node to extract each element from it. Then, perform a check to ensure that the ItemName field from the struct is not empty.
If the condition is true, call the SpawnItem event and pass in both ItemName and ItemMesh obtained from the broken struct. Finally, call the PostDeleteToInventorySpacetime function to delete the item from the database, keeping your local and remote inventory in sync.
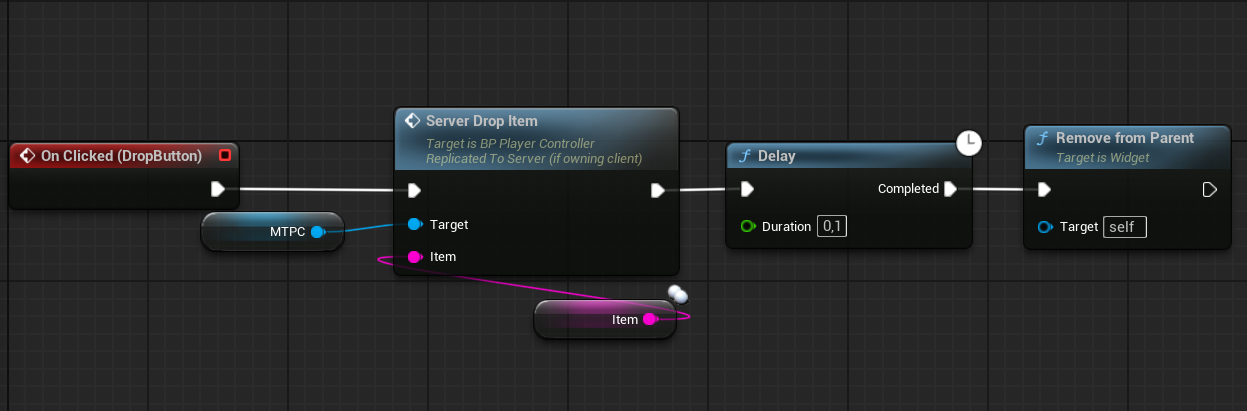
Go back to your WBP_EntryInventory and select the button that you’ll use to drop items. Bind its OnClicked event.
Inside this event, use your reference to PlayerController to call the ServerDropItem function. Then, get the value from the Item variable to retrieve the name of the current item and pass it as a parameter to ServerDropItem.
Finally, add a Delay node set to 0.1 seconds, and then call Remove From Parent to remove the item row from the inventory UI once it’s been dropped.
Go to your Character’s code, declare an input action and also declare and define the following function to call the inventory widget.
Input action, widget variable and function declaration in .h file
UPROPERTY(EditAnywhere, BlueprintReadOnly, Category = Input, meta = (AllowPrivateAccess = "true"))
UInputAction* InventoryToggleAction;

UPROPERTY(EditDefaultsOnly)
TSubclassOf<UUserWidget> InventoryWidgetClass;

UPROPERTY()
UMTInventoryWidget* InventoryWidget;

UFUNCTION()
void ToggleInventory();
Input Action and function definition in .cpp file
//In your SetupPlayerInputComponent
void AMTCharacter::SetupPlayerInputComponent(UInputComponent* PlayerInputComponent)
{
	// Set up action bindings
	if (UEnhancedInputComponent* EnhancedInputComponent = Cast<UEnhancedInputComponent>(PlayerInputComponent)) {

		//Inventory Interaction
		EnhancedInputComponent->BindAction(InventoryToggleAction, ETriggerEvent::Started, this, &AMTCharacter::ToggleInventory);
	}
}


void AMTCharacter::ToggleInventory()
{
	if (!InventoryWidget)
	{
		InventoryWidget = CreateWidget<UMTInventoryWidget>(Cast<APlayerController>(GetController()), InventoryWidgetClass);
		InventoryWidget->AddToViewport(0);
		Cast<APlayerController>(GetController())->SetInputMode(FInputModeUIOnly());
		Cast<APlayerController>(GetController())->bShowMouseCursor = true;
	}
	else
	{
		if (!InventoryWidget->IsVisible())
		{
			InventoryWidget->AddToViewport(0);
			InventoryWidget->SetVisibility(ESlateVisibility::Visible);
			Cast<APlayerController>(GetController())->SetInputMode(FInputModeUIOnly());
			Cast<APlayerController>(GetController())->bShowMouseCursor = true;
		}
		else
		{
			InventoryWidget->SetVisibility(ESlateVisibility::Collapsed);
			Cast<APlayerController>(GetController())->SetInputMode(FInputModeGameOnly());
			Cast<APlayerController>(GetController())->bShowMouseCursor = false;
		}
	}
}
Compile your project. Then open your Character’s blueprint, and with the Class Defaults section selected, go to the Details panel and set the corresponding widget and input.
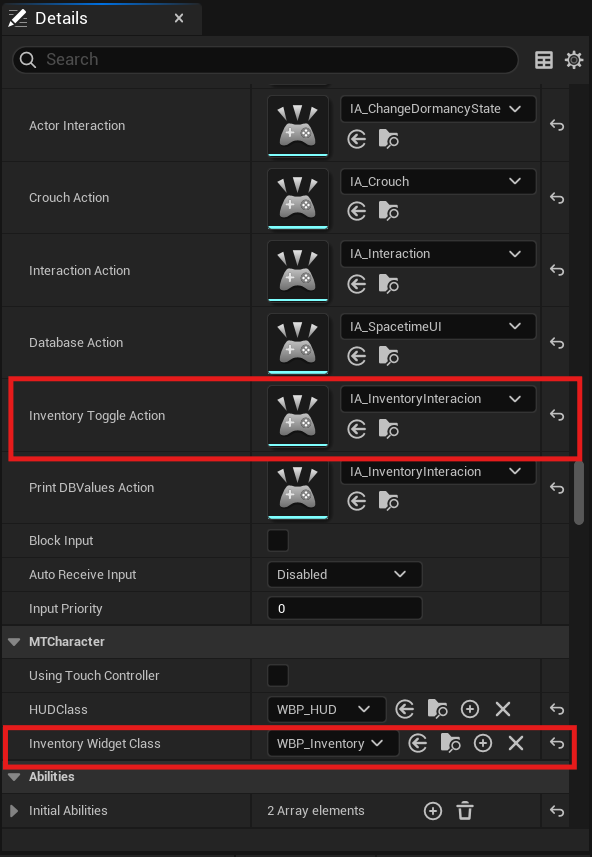
If you’re not running your Spacetime project, open a terminal in Visual Studio Code and type spacetimedb start in the project we’ve been working on. Launch your game in Unreal and make sure your function to obtain the Spacetime Token and the function to register a player are both called at the start of the project. With your player, pick up an item and open your inventory — you should be able to see an item in your list!
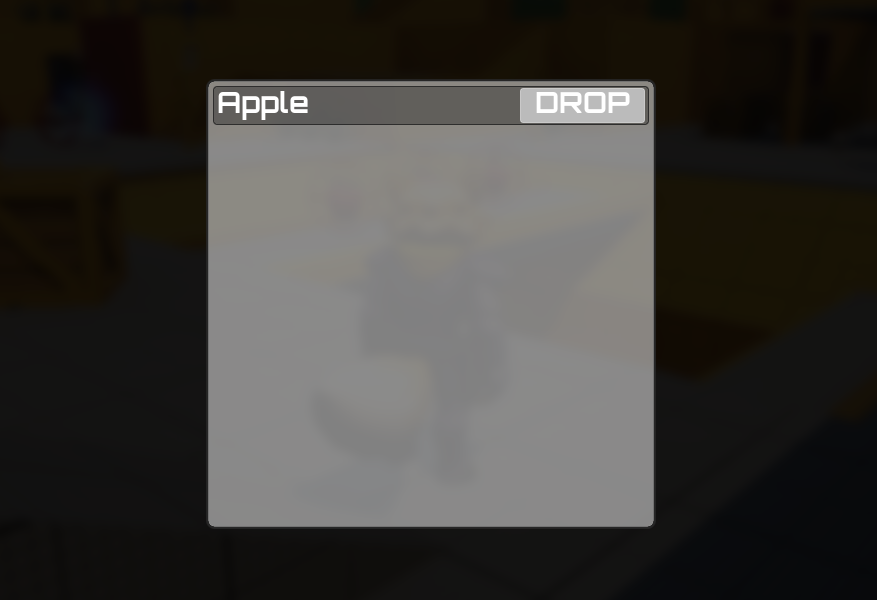
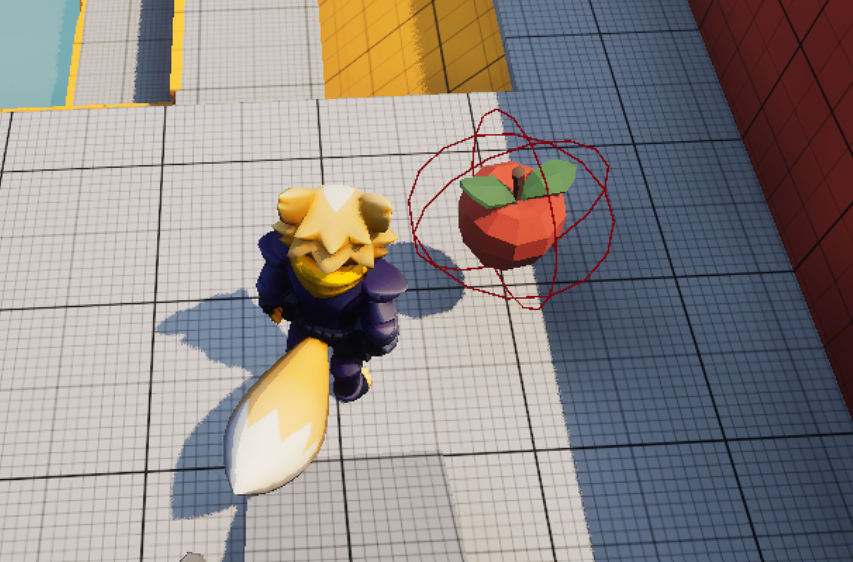
Click the “DROP” button and close your inventory. You should now be able to see the item on the ground, near your player. Make sure to adjust the values so that the item doesn’t spawn within the player’s collision area—otherwise, you’ll pick it up again as soon as it spawns.
References Link to heading
SQL Examples. (n.d.). Www.w3schools.com. https://www.w3schools.com/sql/sql_examples.asp