Gameplay abilities Link to heading
The Gameplay Ability System (GAS) simplifies the creation of abilities by allowing developers to modify attributes, apply effects, spawn sounds and visual effects, handle event-driven actions, integrate root motion, and more.
For a character to use an ability it’s necessary for it to be equipped. To do this we will first create an Array of subclasses of Gameplay Abilities and a function to equip them.
// Character header file
UPROPERTY(EditAnywhere, Category = Abilities)
TArray<TSubclassOf<UGameplayAbility>> InitialAbilities;

UFUNCTION(BlueprintCallable)
void AcquireAbilities(TArray<TSubclassOf<UGameplayAbility>> Abilities);
Gameplay Abilities must be granted only on server side and the ASC class will obtain them.
void AMTCharacter::AcquireAbilities(TArray<TSubclassOf<UGameplayAbility>> Abilities)
{
	if(!HasAuthority()) return;

	if(AMTPlayerState* MTPlayerState = Cast<AMTPlayerState>(GetPlayerState()))
	{
		if(UMTAbilitySystemComponent* MTAbilitySystemComponent = Cast<UMTAbilitySystemComponent>(MTPlayerState->AbilitySystemComponent))
			MTAbilitySystemComponent->AcquireAbilities(InitialAbilities);
	}
}
// ASC header file
public:
	void AcquireAbilities(const TArray<TSubclassOf<UGameplayAbility>> Abilities);
To equip an ability you need to create an FGameplayAbilitySpec struct, which will contain the class of the ability and it’s level.
void UMTAbilitySystemComponent::AcquireAbilities(const TArray<TSubclassOf<UGameplayAbility>> Abilities)
{
	for(TSubclassOf<UGameplayAbility> Ability : Abilities)
	{
		FGameplayAbilitySpec AbilitySpec = FGameplayAbilitySpec(Ability, 1);
		GiveAbility(AbilitySpec);
	}
}
In case you want to activate the ability instantly you can use GiveAbilityAndActivateOnce instead of GiveAbility.
FGameplayAbilitySpec AbilitySpec = FGameplayAbilitySpec(Ability, 1);
GiveAbilityAndActivateOnce(AbilitySpec);
Once the variables and the functions are ready you must create a Gameplay Ability which will inherit from UGameplayAbility (you can also create a blueprint class based on your new class to set elements like meshes or vfx easily).
UCLASS()
class MT_API UMTGameplayAbility : public UGameplayAbility
{
	GENERATED_BODY()

};
Activate Gameplay Abilities by Gameplay Tags Link to heading
Creating tags and sub tags Link to heading
The Unreal Tags System allows you create gameplay tags in a hierarchically to clasify your attributes and abilities. This can be done in the project settings of your game in the Gameplay Tags section.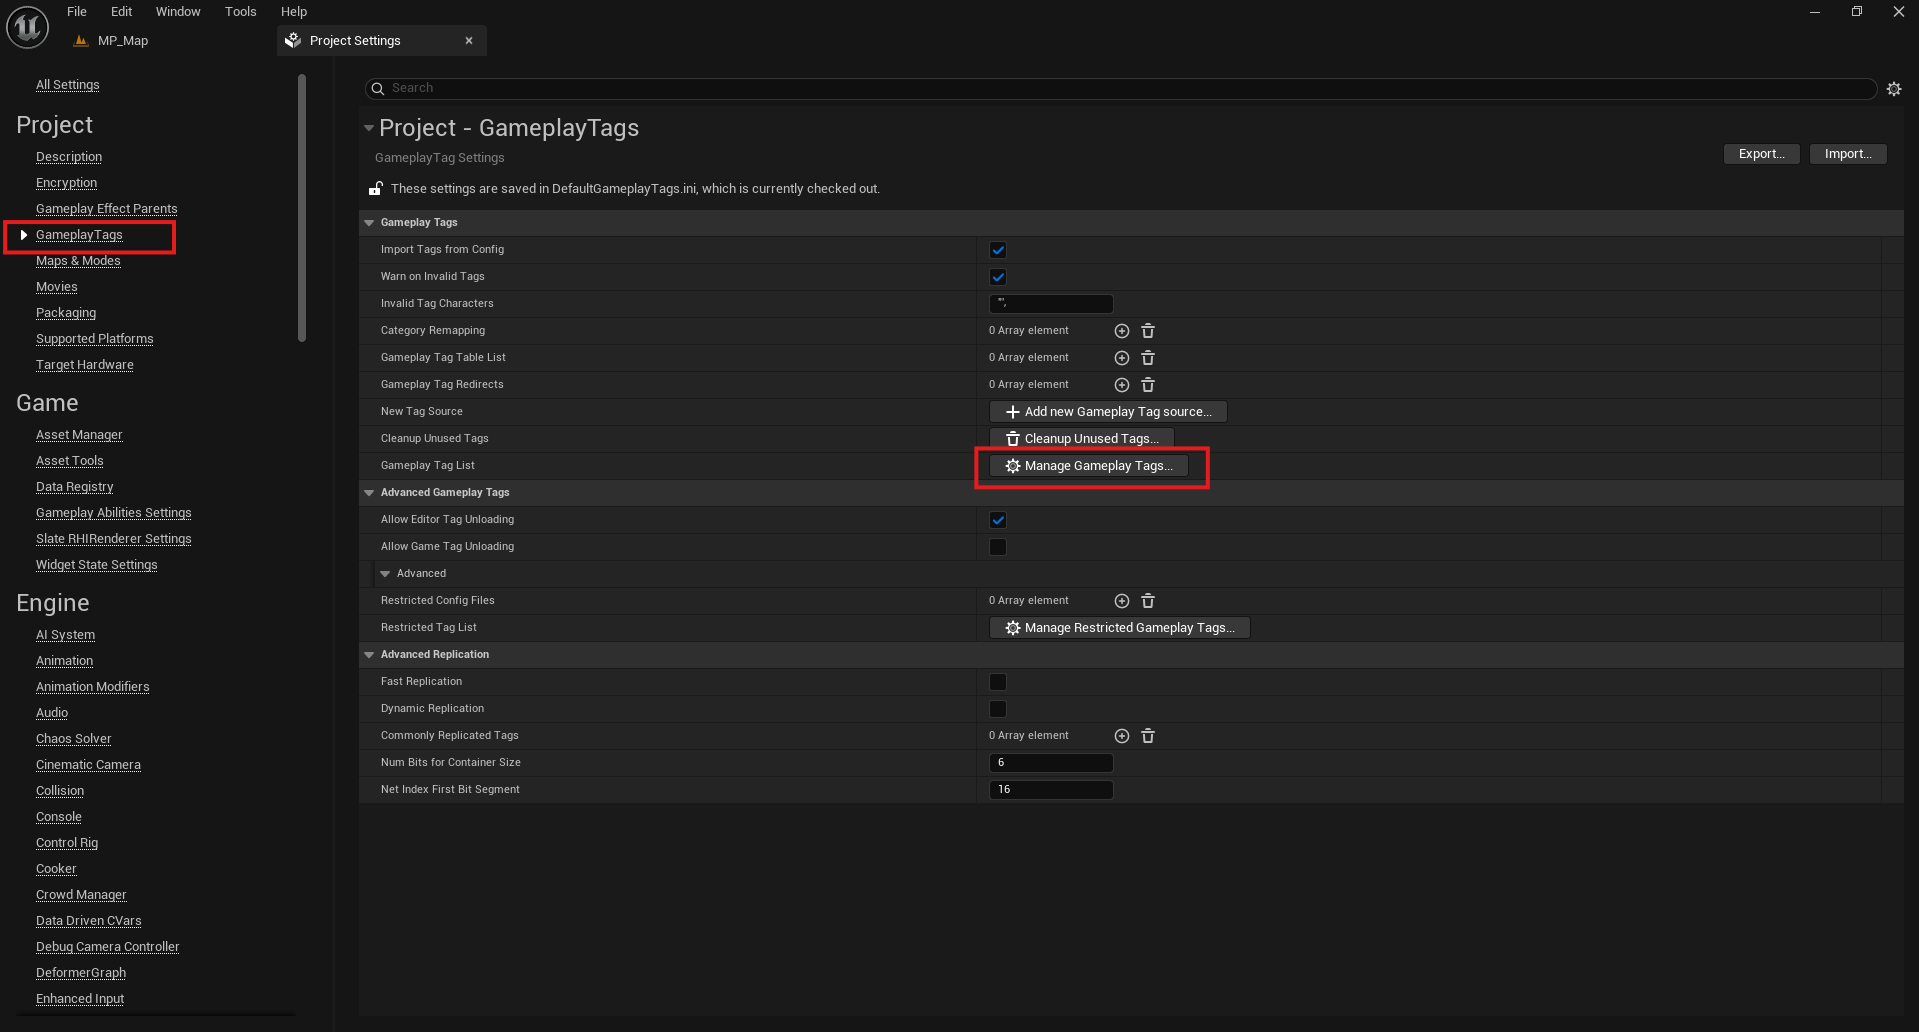 Select “Manage Gameplay Tags” to add a new tag or a sub tag just write tag name on the “Name” text box, if you want to add a sub tag for an existing tag you can add a dot next to your original tag name -> “TagName.SubTagName”.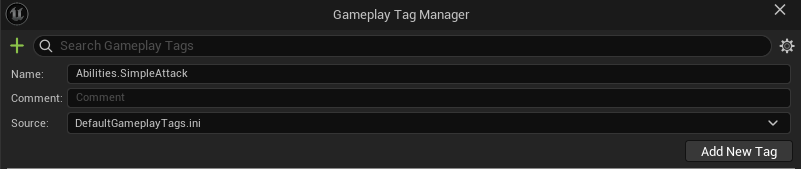
You can also add a new sub tag right clicking on the tag and selecting “Add Sub Tag”.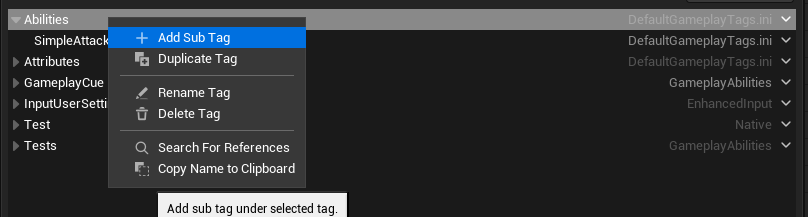
Adding Gameplay Tags to the Abilities Link to heading
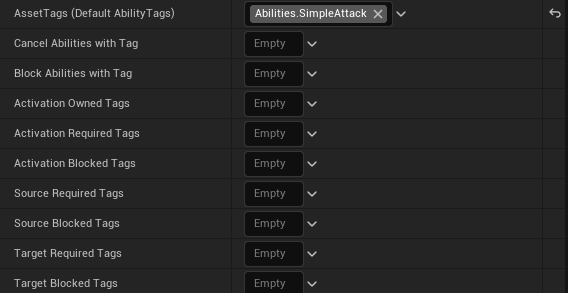
Once the ability class and the tag are ready, you can create blueprint classes inherited from your Gameplay Ability Class and add the new tag to its AssetTags (don’t forget to add the new ability to InitialAbilities variable in your character).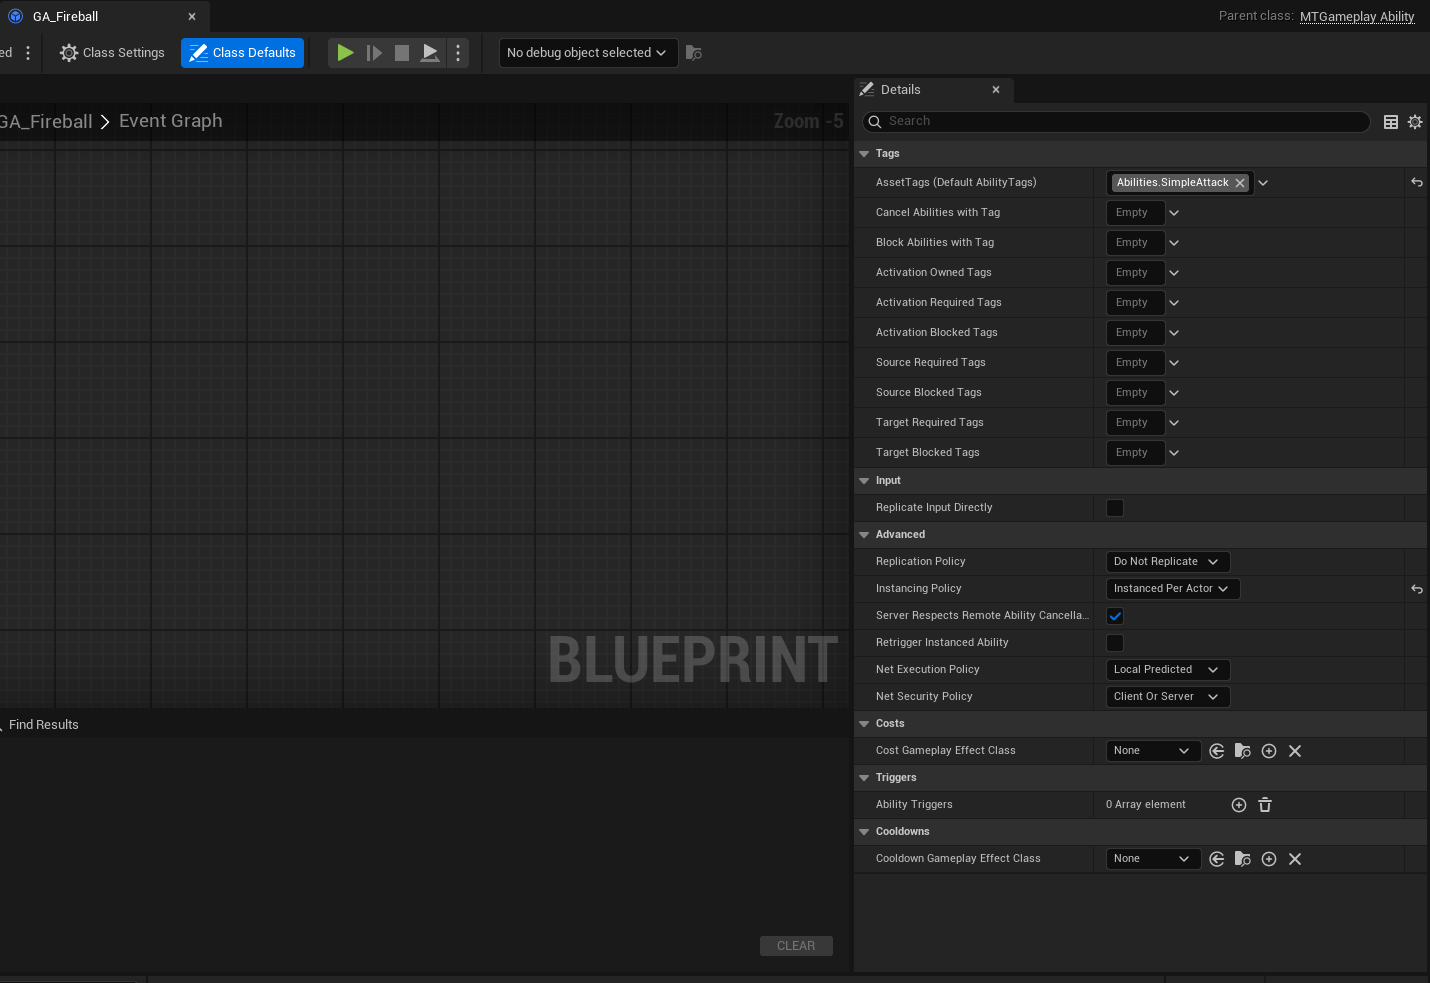
Types of tags Link to heading
- Ability tags: The tags contained by the ability.
- Cancel abilities with tag: The abilities that contain these tags will be canceled if this ability is activated.
- Block abilities with tag: The abilities that contain these tags can’t be activated while this ability is enabled.
- Activation owned tags: The tags that the owner of this ability will receive once it’s activated.
- Activation required tags: The tags that the owner of this ability must have to activate the ability.
- Activation blocked tags: The tags that will block the activation of the ability.
- Source required tags: The tags that the source of the ability must have.
- Source blocked tags: The tags tags that will block the activation in case one of them is present on the source.
- Target required tags: The tags that the target of the ability must have.
- Target blocked tags: The tags that will block the activation in case one of them is present on the target.
Abilities activation Link to heading
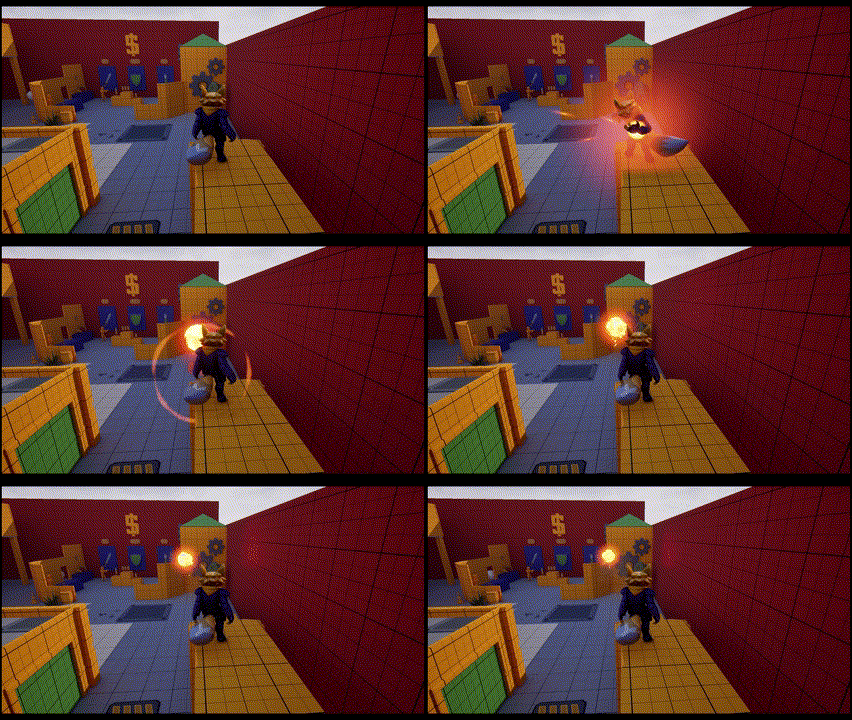
To activate an ability by tag you just have to follow these steps:
- Declare an FGameplayTagContainer struct to store the tags.
- Add the tags for the abilities to activate.
- Use TryActivateAbilitiesByTag sending your FGameplayTagContainer as a parameter.
void AMTCharacter::SimpleAttack()
{
	FGameplayTagContainer TagContainer;
	TagContainer.AddTag(FGameplayTag::RequestGameplayTag(FName("Abilities.SimpleAttack")));
	if(AbilitySystemComponent)
		AbilitySystemComponent->TryActivateAbilitiesByTag(TagContainer);
}
As its name says, TryActivateAbilitiesByTags doesn’t guarantee the activation of the abilities. There are some factors that could interfere with the activation of an ability, such as:
- The ability hasn’t been acquired.
- The owner, source or target don’t have the activation tags required.
- There’s another ability blocking the activation.
Modify effects values Link to heading
To avoid creating multiple effects clases for attributes like Damage that can take different values depending of the abilities you can set the value dynamically using “SetByCaller” option in “Magnitude Calculation Type”.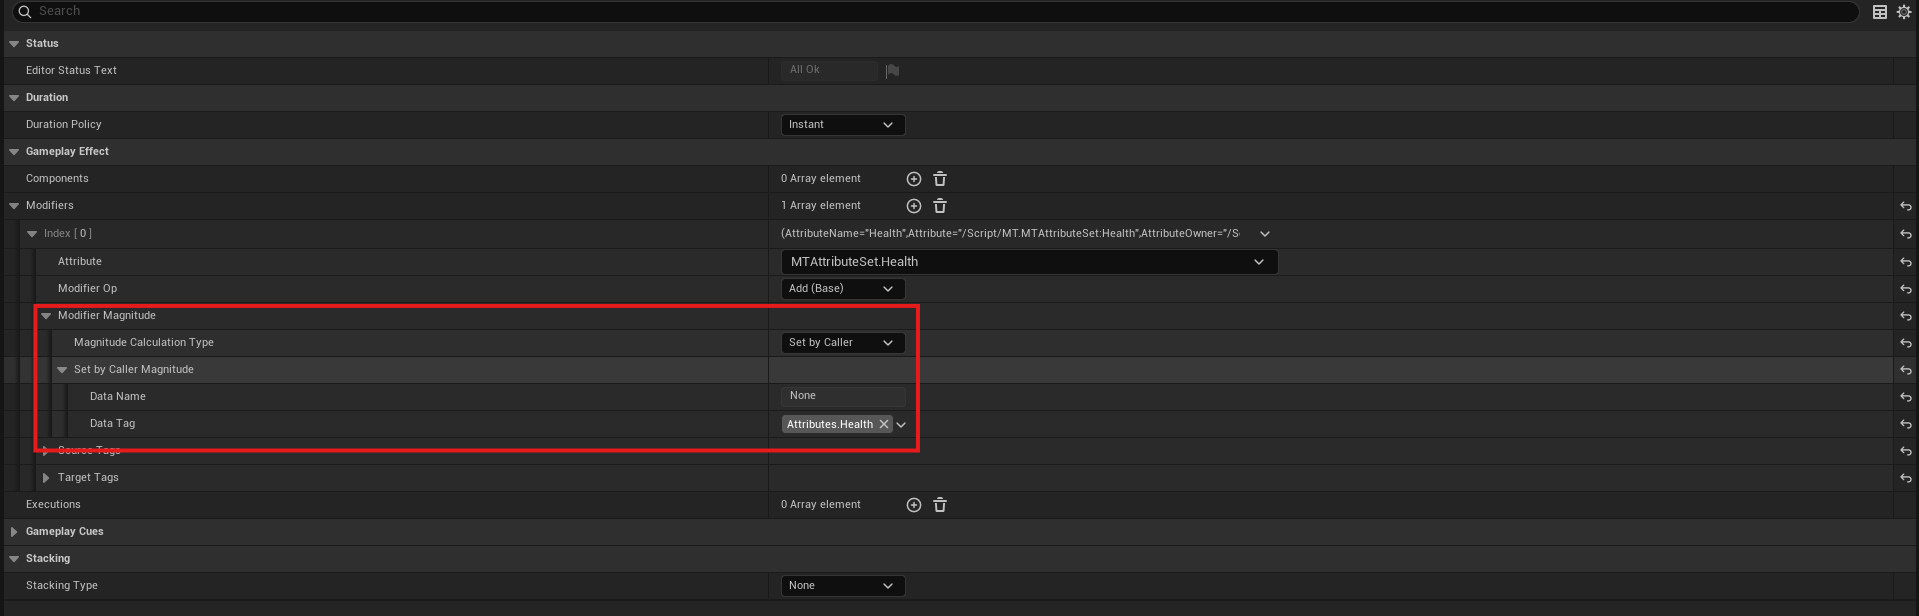
It will also need a tag for the attribute you are going to modify (like we did before in this section).
Once the Gameplay Effect is modified you can create new variables besides the Gameplay Effect to set easily the attribute tag and the value to apply.
// Stats modifier class header file
UPROPERTY(EditAnywhere, BlueprintReadOnly)
TSubclassOf<UGameplayEffect> EffectClass;

UPROPERTY(EditDefaultsOnly, BlueprintReadOnly)
FGameplayTag StatTag;

UPROPERTY(EditDefaultsOnly, BlueprintReadOnly)
float ValueToApply;
To modify values before applying the effect you can create an FGameplayEffectSpecHandle to assign the new value and send it as a parameter on ApplyGameplayEffectSpectToSelf
void AMTStatModifier::ApplyEffect(AActor* Actor)
{
	if(AMTCharacter* Character = Cast<AMTCharacter>(Actor))
	{
		if(UAbilitySystemComponent* AbilitySystem = Character->GetAbilitySystemComponent())
		{
			FGameplayEffectContextHandle EffectContextHandle = AbilitySystem->MakeEffectContext();
			EffectContextHandle.AddSourceObject(this);
			FGameplayEffectSpecHandle EffectHandle = AbilitySystem->MakeOutgoingSpec(EffectClass, 1.0, EffectContextHandle);
			UAbilitySystemBlueprintLibrary::AssignTagSetByCallerMagnitude(EffectHandle, StatTag, ValueToApply);
			AbilitySystem->ApplyGameplayEffectSpecToSelf(*EffectHandle.Data.Get());
		}
	}
	Destroy();
}
Ability cooldown Link to heading
Gameplay abilities contain a special variable and functions for cooldown effects. To implement them in your GameplayAbilities class create a TagContainer for the Cooldown tags and the cooldown definitions you’ll be using as subtags, a float for the cooldown duration and another TagContainer that will be used temporary.
// Gameplay ability header file
UPROPERTY(EditDefaultsOnly, BlueprintReadOnly)
FGameplayTagContainer CooldownTags;

UPROPERTY(EditDefaultsOnly, BlueprintReadOnly)
float CooldownDuration;

UPROPERTY(Transient)
FGameplayTagContainer TempCooldownTags;
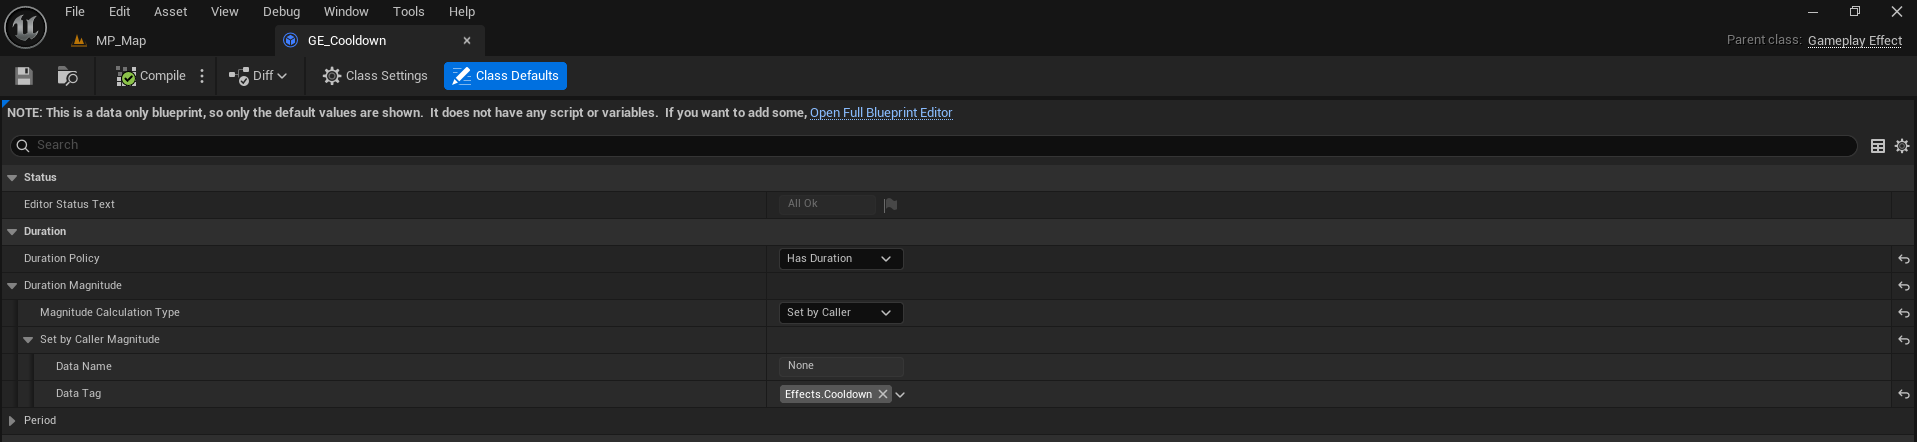
Additonally you must override the functions GetCooldownTags and ApplyCooldown.
virtual void ApplyCooldown(const FGameplayAbilitySpecHandle Handle, const FGameplayAbilityActorInfo* ActorInfo, const FGameplayAbilityActivationInfo ActivationInfo) const override;
virtual const FGameplayTagContainer* GetCooldownTags() const override;
On GetCooldownTags you have to return an FGameplayTagContainer which contains the parent cooldown tags plus your cooldown tags.
const FGameplayTagContainer* UMTGameplayAbility::GetCooldownTags() const
{
	FGameplayTagContainer* NewCooldownTags = const_cast<FGameplayTagContainer*>(&TempCooldownTags);
	NewCooldownTags->Reset();
	const FGameplayTagContainer* ParentTags = Super::GetCooldownTags();

	if (ParentTags)
		NewCooldownTags->AppendTags(*ParentTags);

	NewCooldownTags->AppendTags(CooldownTags);
	return NewCooldownTags;
}
On ApplyCooldown you have to set the duration value for the cooldown similar to how you did it before, but in this case the Gameplay Effect is going to create the Spec Handle and the effect will be applied to the owner.
void UMTGameplayAbility::ApplyCooldown(const FGameplayAbilitySpecHandle Handle, const FGameplayAbilityActorInfo * ActorInfo, const FGameplayAbilityActivationInfo ActivationInfo) const
{
	if (UGameplayEffect* CooldownGE = GetCooldownGameplayEffect()) // Function from UGameplayAbility
	{
		FGameplayEffectSpecHandle SpecHandle = MakeOutgoingGameplayEffectSpec(CooldownGE->GetClass(), GetAbilityLevel());
		SpecHandle.Data.Get()->DynamicGrantedTags.AppendTags(CooldownTags);
		SpecHandle.Data.Get()->SetSetByCallerMagnitude(CooldownTags.First(), CooldownDuration);
		ApplyGameplayEffectSpecToOwner(Handle, ActorInfo, ActivationInfo, SpecHandle);
	}
}
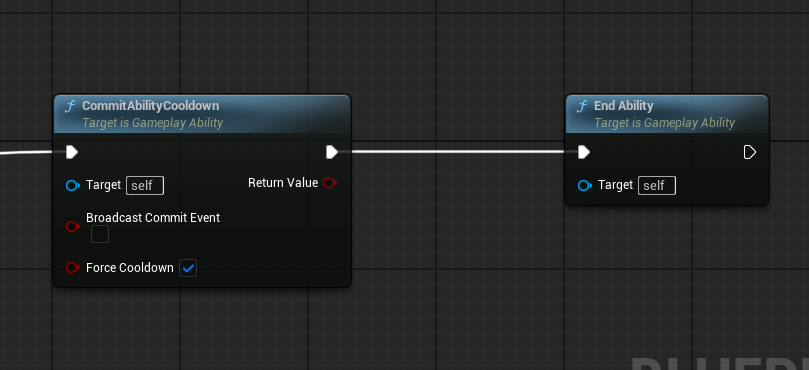
Once your variables and functions are set you just have to call CommitAbilityCooldown before ending your ability.
Ability cost Link to heading
In a similar way to cooldown GAS, a special variable is included for the ability cost gameplay effect. This variable defines the required attribute and amount needed to activate the ability.
To set the cost you have to set a gameplay effect in the Class Defaults.
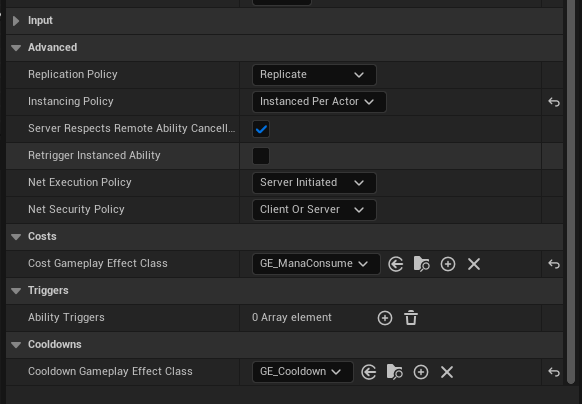
You can also modify the value for the cost but it’s a bit different because in this case you have to override the function ApplyCost in your gameplay ability class.
virtual void ApplyCost(const FGameplayAbilitySpecHandle Handle, const FGameplayAbilityActorInfo* ActorInfo, const FGameplayAbilityActivationInfo ActivationInfo) const override;
To set the cost value you have to use the existing function GetCostGameplayEffect and create a SpecHandle to save the new value for the attribute using a tag. Finally you just have to use the parameters from ApplyCost and the SpecHandle to apply the gameplay effect spec to the ability owner.
void UMTGameplayAbility::ApplyCost(const FGameplayAbilitySpecHandle Handle, const FGameplayAbilityActorInfo* ActorInfo,
	const FGameplayAbilityActivationInfo ActivationInfo) const
{
	UGameplayEffect* CostGE = GetCostGameplayEffect();
	if (CostGE)
	{
		if(TSubclassOf<UGameplayEffect> GE = CostGE->GetClass())
		{
			FGameplayEffectSpecHandle SpecHandle = MakeOutgoingGameplayEffectSpec(GE, GetAbilityLevel(Handle, ActorInfo));
			UAbilitySystemBlueprintLibrary::AssignTagSetByCallerMagnitude(SpecHandle, AttributeCostTag, CostToApply * -1); // CostToApply and AttributeCostTag are custom variables
			ApplyGameplayEffectSpecToOwner(Handle, ActorInfo, ActivationInfo, SpecHandle);
		}
	}
}
The cost is not applied automatically, you have to call the function CommitAbilityCost. One of the most common places to call it is on your EndAbility function override.
void UMTGameplayAbility::EndAbility(const FGameplayAbilitySpecHandle Handle, const FGameplayAbilityActorInfo* ActorInfo,
	const FGameplayAbilityActivationInfo ActivationInfo, bool bReplicateEndAbility, bool bWasCancelled)
{
	Super::EndAbility(Handle, ActorInfo, ActivationInfo, bReplicateEndAbility, bWasCancelled);

	CommitAbilityCost(Handle, ActorInfo, ActivationInfo);
}
Removing abilities Link to heading
Sometimes you will need to remove an ability when you want to change the ability asociated to an input or when your player is in a ceratin situation where the ability can be used. To make that possible you can remove abilities by tag or class.
## Removing ability by class
void AMTAbilityTrigger::RemoveAbility()
{
   if(HasAuthority())
   {
   	if(AMTCharacter* MTCharacter = Cast<AMTCharacter>(TriggeredCharacter))
   	{
   		if(UMTAbilitySystemComponent* ASC = Cast<UMTAbilitySystemComponent>(MTCharacter->GetAbilitySystemComponent()))
   		{
   			for(FGameplayAbilitySpec Spec : ASC->GetActivatableAbilities())
   			{
   				if(Spec.Ability->GetClass() == AbilitiesToGrant[0])
   				{
   					ASC->ClearAbility(Spec.Handle);
   					TriggeredCharacter = nullptr;
   					break;
   				}
   			}
   		}
   	}
   }
}
## Removing ability by tag
void AMTAbilityTrigger::RemoveAbility()
{
   if(HasAuthority())
   {
   	if(AMTCharacter* MTCharacter = Cast<AMTCharacter>(TriggeredCharacter))
   	{
   		if(UMTAbilitySystemComponent* ASC = Cast<UMTAbilitySystemComponent>(MTCharacter->GetAbilitySystemComponent()))
   		{
   			TArray<FGameplayAbilitySpec*> AbilitiesToRemove;
   			FGameplayTagContainer TagContainer;
   			TagContainer.AddTag(FGameplayTag::RequestGameplayTag("Abilities.InteractionAbility"));
   			ASC->GetActivatableGameplayAbilitySpecsByAllMatchingTags(TagContainer, AbilitiesToRemove);

   			for (FGameplayAbilitySpec* Spec : AbilitiesToRemove)
   			{
   				if (Spec && Spec->Handle.IsValid())
   					ASC->ClearAbility(Spec->Handle);
   			}
   		}
   	}
   }
}
References Link to heading
- Tranek. (s. f.-b). GitHub - tranek/GASDocumentation: My understanding of Unreal Engine 5’s GameplayAbilitySystem plugin with a simple multiplayer sample project. GitHub. https://github.com/tranek/GASDocumentation?tab=readme-ov-file#concepts-ge-cooldown
- Using Gameplay Abilities in Unreal Engine | Unreal Engine 5.5 Documentation | Epic Developer Community. (2025). Epic Games Developer. https://dev.epicgames.com/documentation/en-us/unreal-engine/using-gameplay-abilities-in-unreal-engine
- Using Gameplay Tags in Unreal Engine | Unreal Engine 5.5 Documentation | Epic Developer Community. (2025). Epic Games Developer. https://dev.epicgames.com/documentation/en-us/unreal-engine/using-gameplay-tags-in-unreal-engine
- FGameplayAbilitySpec | Unreal Engine 5.5 Documentation | Epic Developer Community. (2025). Epic Games Developer. https://dev.epicgames.com/documentation/en-us/unreal-engine/API/Plugins/GameplayAbilities/FGameplayAbilitySpec